Stenciled Wall Take Two ||+ Win a Stencil||

Hi friends! Posts like we shared yesterday are really what it's all about here - YOU! And we sure are crazy about ya. Isn't it time we move this thing to the next relational level and give you a small token of our love? We've partnered up with the incredibly kind and talented team at Cutting Edge Stencils to do just that! We want to shower you with our love and a free stencil! 

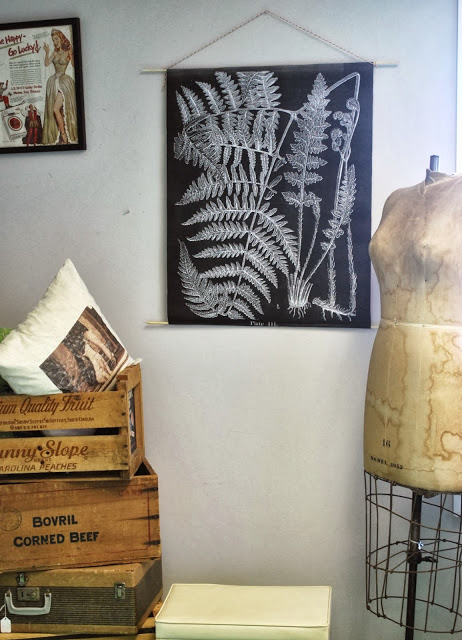
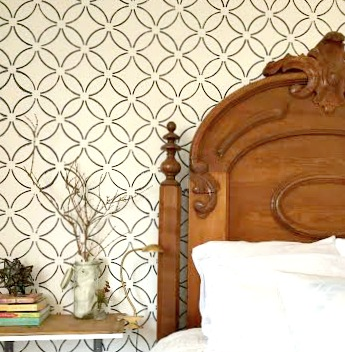
In case you missed it, I was in a stencil frenzy a couple weeks ago after creating this accent wall in our bedroom using Cutting Edge Stencils' 'Fuji' stencil. I've noticed a few comments on Instagram complimenting on the wallpaper - it sure looks like it! But let me tell you, wallpaper has no room on my schedule or budget!  This wall took all of 2 hours, including prep. As a stay at home Mom to three wild ones, time is very valuable to me. To get this much bang for 2 hours of effort is my project happy place. 

I've got a second stenciled wall to share with you guys today, and then all you need to do is hop over to Cutting Edge Stencils, pick out a favorite stencil and leave a comment on this post with your pick! You have until this Sunday, 3/8 at noon to enter for a chance to win your chosen stencil! For additional entries, like Cutting Edge Stencils on Facebook and follow their blog.

Today's stencil project was made possible by the kind folks at the Chambrel retirement community where my dear grandparents have just moved in. They encourage their residents to decorate and make their new apartments and rooms their home. Isn't that awesome! I'm reserving my spot early! 

Here is a sad photo of their bedroom, pre-stencil, (complete with the Crooked Lamp - All-star of all the great Before pictures in the history of Befores):

And 2.5 hours later:

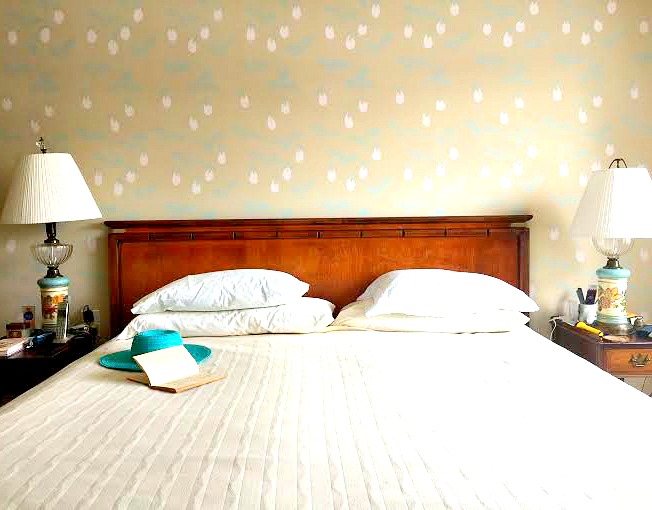
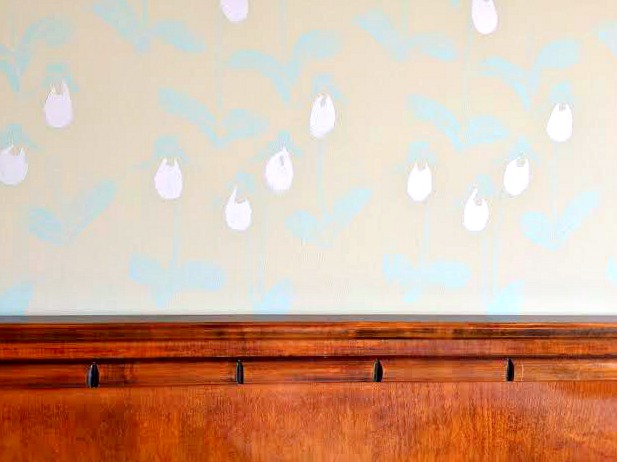
My grandparents are old time Miami, (or "Miama", as they say). Born and raised in Coral Gables, Florida, they were high school sweethearts who moved to Virginia, where they have lived for most of their lives surrounded by their 5 children, 17 grandchildren, and a nice litter of great-grands. After all these years, (they are 87yrs old), you still find bright florals and energetic colors in my grandmothers decor and closet. You can take the lady out of Miami, but you can't take Miami out of the lady!

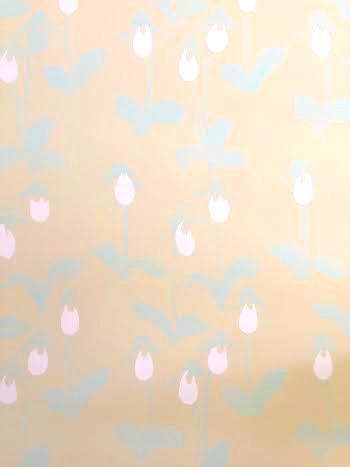
When planning this wall we knew something floral would be a nice familiar taste of the South for them. The delicate stencil, Lady Slipper, was a sure-fire winner! Since they are fairly traditional, the soft colors don't play as too loud or modern. We used Carolina Inn Club Aqua, (#5004-3B), and Rose Buff, (#2002-4C), both by Valspar and both in a flat finish, (per the helpful instructions provided by Cutting Edge Stencils). 

Just like with our own bedroom, I used painters tape to stick the stencil to the wall in order to roll the paint over. What I did differently this time around, (and LOVED), was the foam roller which Cutting Edge Stencil's sells. The paint didn't get underneath the stencil one bit, and I had so much control with the application. You really don't want a lot of paint on your roller anyways, just a little bit goes a long way! I'd suggest doing a quick clean with your stencil sheet about half way through so that drying paint doesn't start clumping up inside the delicate cuts of the stencil. A dampened paper towel or rag is all you need.

Now you can see how this project flies by! 2.5 hours, folks. Enough said.

This time around I had my Mom following behind me as I rolled, adding a few strokes of soft pink paint to the lower petal of the orchids. 

The last step was using the awesome edger stencil that Cutting Edge Stenils provides to get a tighter fit up to the corners and near the floor.

So there you have it! Two beautiful transformations brought to you by Cutting Edge stencils and my right arm. 

Alright, you know what to do now! Head over to Cutting Edge Stencils, pick your favorite stencil, (tough, I know), jump back over here and leave a comment below with your top pick! And don't forget to up your chances by liking their Facebook page and following their blog!

You've got until Sunday 3/8 at 12 noon EST for a chance at a free stencil! We'll announce the winner on Monday 3/9 and follow up with that lucky duck then. Now, hustle like the lady in pink slippers; she is in it to win it, ya'll!!!

In the meantime you can brush up on your stenciling skills with this quick tutorial video that helps all you watch-and-learners out there prepare before you begin!

Thank you all so much for stopping by!


A hearty Thank You!

You're invited!!  We are throwing a little party here on StyleMutt Home.  Nope, we're not poppin' the champagne a tad early on our 6 month birthday, we are celebrating you!

You guys!
THANK YOU!!!

When we sat down on September 19, 2014 for our first official business meeting, (NOT in a hot-tub), we were in a frenzy of excitement. We had high hopes and dreams for StyleMutt Home and couldn't wait to get rollin'. But there's always that little voice of reality that holds those expectations in check and keeps our feet on the ground. We were confident in what StyleMutt Home could be, but had no certainty it would get there in a timely manner, if ever.

And now, nearly 6 months later, we are just blown away by what you have made us! Not only has StyleMutt Home become what we dreamed it to be, it's better than we had imagined because of you! You have overwhelmed us with encouragement  on Instagram, sent us such supportive emails, and most importantly blown us away with your unique input to StyleMutt Home.  

This blog is not about two people; it's grown into this amazing community which we are so grateful for!  Our desire from the beginning was that this be an inspirational, informative DIY and Home Decor resource; a place for others to come and gather ideas, tips and tricks for their own home projects.  We just didn't anticipate how much of a blessing it would be to get to know you all through this cozy spot in the great world wide web!

We've been so showered with your support and encouragement that this post is difficult to write! You have blessed us beyond what our words can express.  So we'll just have to show you how we feel...

Blogging 101: 
Every blog needs it's own cute mascot.

15.jpg

Check.


We just wanted to drop by today to tell you how much we so appreciate you all. We'd much rather invite you all over and throw down, but since our guest list would span the globe (!!!), we've got the next best thing: A GIVEAWAY!!! Whoop, whoop! 

Deets on that juicy news will be up tomorrow, so stay tuned!


An Educational Guide to Vintage Chart Hacks

Guys, I have another completed furniture flip bucket list item to share!  Believe me, I am as surprised as you are - this is the first time I have ever been this intentional with my New Year's resolutions and I have you all to thank for it!  Seriously, without the accountability of sharing my intentions with you, I would still be piddling around the thrift store.  This new level of productivity is madness, I tell you, madness!  

Not only does this post mark the second completed item, but I actually have 2 more on deck.  Can you guess which ones will be crossed off next?  

Ok before we begin, let's take a look out our muse: the vintage pull-down chart

Source: Mighty Vintage

Source: Mighty Vintage

Oh $400 Rose Cherry Botanical Chart  - why must you elude me so?  In all fairness, this is a particularly rare print which is why it's up-there in price.  But still, I can't be shelling out $200 a pop to feed my pull-down chart obsession!  So as I like to say: if you can't join 'em...

HACK em'

Keeping with the schoolhouse theme of the vintage educational charts,  I thought we could grade my findings on the following scale: printing, color quality, size options, and of course...cost.  First up: inverse engineer prints.

Printing: on paper at Staples

Color Quality: none

Sizes:

18"x 24"
24" x 36"
36" x 48"

Cost: $2-$8 engineer print + framing supplies


Since engineer prints are stuck being black and white, why not mix it up a little by printing one that's got a black background with a white design?

Teacher's Notes: This hack does not fulfill the "In Color" portion of the assignment.  But at least has some cool factor and the dark background is very on-trend with vintage charts.  Overall Rating: C+

Nothing to really take home and put on the fridge (based on this assignment) so moving on.


Print.png

Printing: On poster paper at Staples     

Color Quality: High         

Sizes:

11.3” X 17.3”
18” x 24”
24” x 36” 

Cost: $20-$36 for printing + shipping + framing supplies 

I uploaded this Free Lavender Botanical Printable from the Graphics Fairy to Staples online print site and found that ordering a poster takes you through this fun little preview tool.

Teacher's Notes: You’ll want to find a high-quality graphic that works with the limited dimension options because (as I've found) cutting the poster paper curls the edges.  Overall Rating:  B


Chartify 2.png

Printing: None required 

Color Quality: High

Sizes: Various     

Cost: Varies with poster size + shipping +  framing supplies


Buy a poster to chartify like Chris Loves Julia did in their Greta's Butterflies Post.  They get extra credit for the added card catalog label!  Nice touch you two.  Like their look? You can buy this Butterfly Specimen Chart for $24 at Urban Outfitters. They have a wide selection of posters that range from botanicals and quirky quotes to moon phases and maps.  You can easily stick to the vintage educational chart look or veer into more modern wall art piece. 

Teacher's Notes: Yes, there are endless poster possibilities for sale, but you're missing the image-customization factor because you're stuck with what you can get for market value.  Overall Rating:  B+


Printing: On paper at Staples

Color Quality: None

Sizes:

18” x 24”
24” x  36”
36” x 48”

Cost: $2-$8 engineer print + coloring supplies + framing supplies 

Source: Scout and Whistle

Source: Scout and Whistle

So I've been drooling over this Gem and Crystal Print from Scout and Whistle for a while now.  I just wish it was a better price for it's petite size.  So this got me thinking... couldn't you just make like 2nd grader and color in the lines or your own black-and-white engineer print?

I rendered my own mineral coloring page to show you. The facets make it so easy to color block your way to a kick a** chart.

Teacher's Notes: Although it's not a glamorous a solution, it could have really fun results!  Give it to the kids as a giant coloring page and get a one-of-a-kind art project!  Overall Rating: A- 


Printing: On vinyl at Staples

Color Quality: High

Sizes:

19.2” x 36”
30” x 48”
30” x 72”
30” x 96” 

Cost: $20-$67 printing + shipping + framing supplies 

Vintage charts are printed on more of a fabric material than paper anyways.  So the suppleness of vinyl is a natural step in the right direction.  In fact, the pull-down charts in my elementary school were made of vinyl so why not adapt a banner to our needs? 

Thank you Staples preview image, but we're not going for the display-table-at-an-expo look.  But retro-fitting the banner with the wooden framing strips looks lovely!


Teacher's Notes: Decent price for such large results.  Plus the material makes it actually feel like a pull down chart!  Overall Rating: A+


There you have it!  My personal winner is the vinyl banner route.  I actually scored a Staples printing sale and ordered my 19.2" x 30" for only $15.  Adding in the wood for my frame brought that total to about $24 - and it's so much more durable than the paper!  

If course after I handed in my findings I stumbled up on this on the Staples printing website:

Labeled 2.png

I haven't tried it yet, but I'll report back to you if I do.  And if you've done your own research for a colored pull-down hack and have a different take on these findings, please share with the class!