~Brown paper packages tied up with strings~

...these are a few of my favorite things!

Hi friends! 

How are you doing? Not spreading yourselves too thin, I hope. This is a challenging time of year for those Type A perfectionists out there.  I'm not one of them. Not completely, at least. But a dash enough to know it can be exhausting trying to get everything 'just so' before Christmas.

Just try and remember that the joys and blessings of Christmas do not rest on your shoulders. In fact, they have nothing to do with how your home looks or what gifts are given. All this decorating and gift exchanging is simply a wonderfully fun way of putting an exclamation point on the reason at the forefront of our celebrating. :)

On that note, I was listening to 'My Favorite Things' the other week while watching the Sound of Music live with Carrie Underwood, (no one compares to Julie Andrews), and the lyrics struck me. Nothing on the favorite things list is all that spectacular, which reminded me of the impact that simple joys can have...

...which prompted my Christmas gift wrap this year!

Supplies:
Brown postal wrap
Teal and white string & Gold and white string
A rainbow of paint swatches collected from Home Depot, Lowes, and Benjamin Moore

The postal wrap, bought from Target for $6, is 4 or 5 times the size of a normal roll of wrapping paper. What a money saver! The string was less than $2 per spool and the paint swatches were free. After all the gifts are bought it's nice to save what you can on gift wrap!

But this simple gift wrap has a festively fun impact, don't ya think?

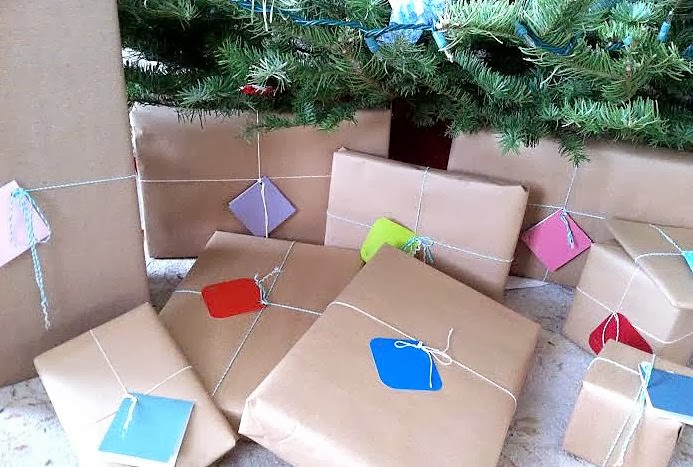
For each gift I wrapped it was fun to consider the person who would receive it and think about what color to use for them!

Pretty simple but I love the snaps of color with the paint swatch gift tags!

Enjoy your weekend, friends! On Monday I'll post the photos you've sent of your projects and homes decorated for Christmas, so if you feel up for sharing please email me your pics at chelseasgarage@gmail.com!

~Chelsea

This post was originally published under Chelsea's Garage, now affectionately known as StyleMutt.

One A Week {Star tree-topper}

Hi All! I don't know about you, but there is something about the holiday season that slows me down a bit. With all there is to do and prepare, I find myself taking my time with no particular rush. My little ones and I have thoroughly been enjoying some later mornings in our pjs, having picnic breakfasts on the floor of our basement while we watch Christmas movies, and then getting dressed with no particular agenda for the day and seeing where the wind blows us. try to spend a few quiet moments with the Lord every morning before my kids wake up. Sometimes I just sit and look out the window and pray about things on my heart. Sometimes I crack open a devotional and/or read my Bible. Lately, I've enjoyed going through an advent devotional that started December 1 and goes until December 25. It was given to me and at first I wasn't so sure I'd get a whole lot from it; I thought it would just go slowly through the events leading to the birth of Jesus. But, there is less emphasis on how He was born, and more on why He was born. 

Joy. Pure, uninhibited, free joy. 

Jesus had to be born a human man in the flesh so that he could die with our sin. And, "if we do not need to fear our last and greatest enemy, death, then we do not need to fear anything. We can be free: free for joy, free for others." Pastor John Piper

I guess you could say joy is the root of my recent laziness. There is not a whole lot I feel like doing but bask in the gifts that God has lavished over my undeserving self. Four of them, in particular - my husband and our children. There is so much  that our kids are amazed over at this time of year, and all I find myself doing is sitting back and watching them with a renewed sense of amazement myself.

Today, I have an 'unplanned' One A Week Christmas DIY project to share. Early last week the star tree topper that my husband and I picked together for our first Christmas broke. It made me a little sad; it wasn't anything spectacular, but I have wonderful memories of our first Christmas together. Our first Christmas tree didn't have a lot of ornaments, but it had a bright, lit up star that we had picked out. For its replacement, I tried my hand at making a star tree-topper out of a wire shirt hanger. It was an easy project that my kids enjoyed watching and sharing input.

Supplies:
wire hanger
twine
floral wire

Step 1: Unwind the hook of the hanger

Step 2: Straighten your wire hanger out

Step 3: Bend five 'fingers' in the wire

 Step 4: Pull the 'fingers' around until your two ends meet, then wind the two ends together

Step 5: Tie an end of twine onto your star in a knot, then wrap the twine around the entire star, knotting again at the end

Step 6: Wrap some floral wire around an inset of the star a few times, then 'curl' it out, (the 'curl' will be where you slide it onto the top of your tree)

All finished!

So, the down side is that it's a bit hard to see against our white walls. But, it was a quick and easy replacement and gets the job done. At least for this year. :) 

If you are up for sharing, please send photos of any of these, (or your own), Christmas decorating projects! I'm going to post them all the week of Christmas!

Thank you so much for stopping by!

~Chelsea

This post was originally published under Chelsea's Garage, now affectionately known as StyleMutt.

Whimsical Christmas decorating: Full home tour

Hi friends! It has been such a joy to see the pictures some of you have sent of your homes decorated for Christmas! Keep em' coming; your creativity has been so inspiring, (and I'll be compiling them to one post to share close to Christmas)! I finished all our decorating earlier this week and thought it would be fun to share a full tour!

I never decorate for the holidays with any particular theme or color scheme, but I like the decorating to feel fresh and unique year after year. Since I don't want to spend $$$ on brand new decorations, this stretches my imagination with what we already have - and gives me the opportunity to make new things myself! As you tour the rooms I have linked some of the DIY projects for you to check out if you'd like, and a few more will be coming soon!

Please come in and enjoy the tour!

Holiday living room

Pom-pom garland tutorial here

Our young children, (ages 4, 4 and 2), set up the nativity for the first time this year. I love that they huddled everyone around baby Jesus!

Rather than buy all new pillows for Christmas and the winter, I rummaged my closet and pulled out two brown belts to gather around my large white pillows!

During our snow days earlier this week the little ones and I got busy making some snowflakes of our own inside, (tutorial coming soon)!

I haven't made paper snowflakes in decades! What fun!

Sadly, the tree topper that my husband and I picked out together before our first Christmas broke earlier this week. I made this one from a wire coat hanger wrapped in twine! Tutorial coming soon.

Front Entrance

Homemade sign

Cardboard ornaments

Dining room

Lumbar pillows made from placemats!

Pom-pom yarn wreath

Trimmed Christmas tree stumps used as candle bases

Bedrooms

Welcome to Shire's room!

I just added a little 'ice' to her homemade headboard

Welcome to Colin's and Mason's room!

A couple familiar pals are droppin' in for the holidays

And finally, welcome to the master bedroom!

Block printed lampshade tutorial here

I recovered my corner chair with a soft navy and gold plaid fabric for the holidays and winter months!

A nod to our beloved home state: the cardinal; our state bird!

A few small sprigs from our Noble fir fit nicely in a pair of mismatched Mason jars

Merry Christmas, to all!

 Thank you so much for coming by! 

~Chelsea

This post was originally published under Chelsea's Garage, now affectionately known as StyleMutt.