Retirement for a tired suitcase

It's pretty awesome to find a gem on the side of the road, such as with yesterday's roadside rescue. To find two in one week? Ridiculously awesome. Last week was a pretty good week...

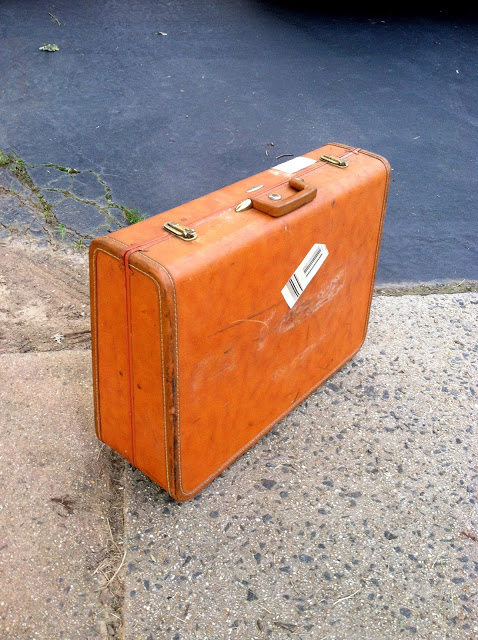
Descent smelling, good condition, camel color leather suitcase left out for trash pick-up during an evening walk?

Don't mind if I do!

I had two similar ideas for this item: keep it together and create a bar cart, or break it in half and create two bedside tables. Since I am in need of a couple bedside tables for a design project, (which I can't wait to share with you soon), I decided to separate the two halves of my suitcase. It really was very easy to do and required just a little cutting with handheld garden shears. 

The next part I forgot to photograph, but it's easy to explain. I set up a couple wooden TV tray tables outside with some cardboard underneath, and sprayed them with satin black spray paint by Rustoleum. Then I set one suitcase half on top of each table and screwed them onto the tabletop, (one screw per corner of the table, so 4 total per table). 

The final product

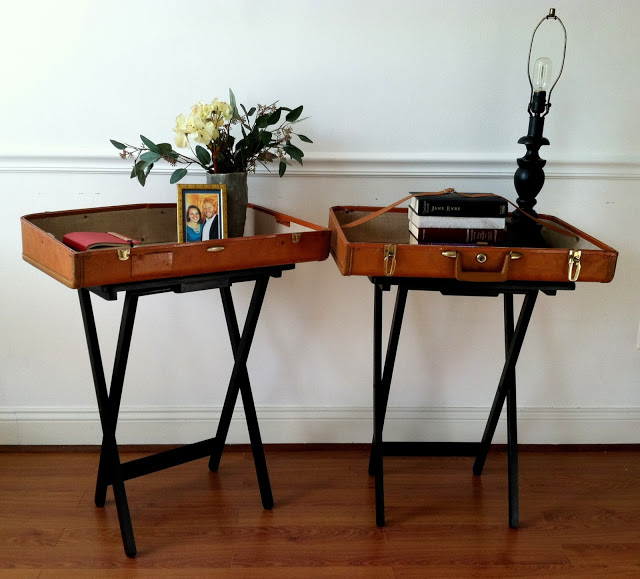
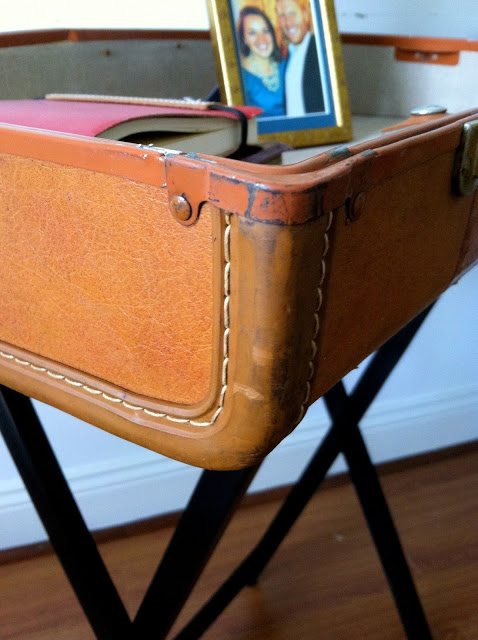
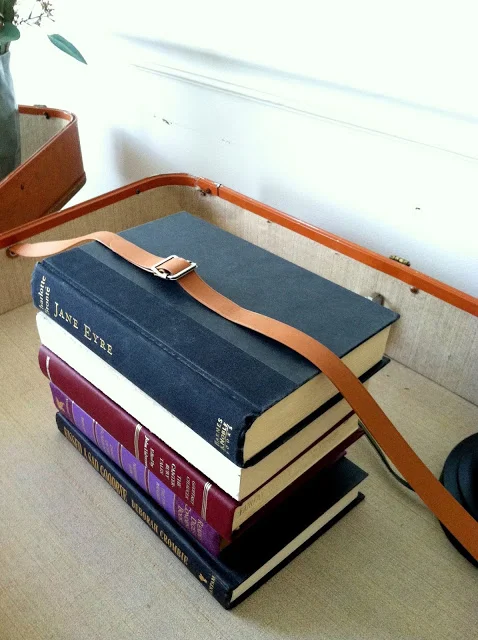
I love the details that make these tables so unique. I didn't try to remove the handle or the locks or change the quality of the leather. I really kept the character of this old suitcase in tact, right down to the leather packing strap.

Leather suitcases are popping up in home design a lot these days, especially now that few people actually travel with leather suitcases anymore. All we have in our closets here are rolling suitcases or duffle bags! How about you? Would you decorate using a leather suitcase?

~Chelsea

This post was originally featured under Chelsea's Garage, now affectionately known as StyleMutt.

Roadside find: Gorgeous chair on casters!

Warning: The following image may move you to tears and result in the sudden urge to donate to your local thrift store.

I found this chair left on the side of the road near our gym one morning a few weeks ago. Instead of making my turn for the gym, I drove straight across the street when this beauty caught my eye. I'm weary of pulling things out of tall grass. First of all, snakes. Second of all, spiders. Third of all, snakes. So I tried to keep my feet on that furthest patch of blacktop and reached over to pull it out...then I jumped out of the way, just in case.

Upon super close inspection, (since I had to put this thing straight into my car where I also had my 3 helpless little spider snacks, ages 3, 3, and 2),  I realized it probably hadn't been abandoned for very long. No cobwebs, no dampness,  and no other signs typical of long outdoor wear. So in the ol' van it went! 

And it was finished before dark that same day.

Painted 'Spring Mint' by Behr

My latest mini-obsession is with very pale mint green paired with vibrant jewel tones. So I had to snap a pic with this gorgeous pillow I found on clearance at Target. Looks like watercolor doesn't it?!

Very minimal distressing that happened naturally as I applied the sealer

SOLD

The low-down:
-Gave the chair a good scrub down with the hose and a thick bristle brush, wiped dry and let air dry completely
-Sanded everywhere except for the cane using 120grit sandpaper
-Blue taped around the wheels and base of the chair
-Used Rustoleum spray on primer over everything but the base
-Painted 3 coats of Spring Mint by Behr using a 2.5" brush, (when painting cane, do not overload your brush with paint. Just dip in the very ends and then move over the cane in a circular motion so the paint doesn't get clogged or glopped inside the little holes)
-Using a clean rag, I applied Minwax Polyurethane clear high gloss sealer

Thank you so much for stopping by!

~Chelsea

This post was originally featured under Chelsea's Garage, now affectionately known as StyleMutt.

Dippin' into color

Hi guys! Today I wanted to share about a recent trend that I've had mixed feelings about; color dipping. It's a painting technique that I've seen used on small items such as mixing spoons, to larger pieces of furniture.

Source: Kick

Source: Kick

I like it much better on the spoons than on that chair. I see that chair and just feel like it's incomplete. Ha! Nevertheless, it is a trend that is hard to ignore right now, especially in my line of work with refinishing furniture. I love seeing other techniques being done even if they're not my personal style. 

I decided to give color dipping a try for myself. Even though I've been mixed about the look, the technique itself still seemed fun! I may not have tried it if I didn't have just  the perfect piece: A bamboo and metal plant stand that I got from Goodwill over 3 years ago and never really used. It occupied a couple lonely corners of our home here and there until settling nicely into the garage for the last year or so to collect cobwebs.

I had always thought this bamboo plant stand would be much more functional if converted to a couple nesting tables. So I grabbed a hand saw and cut it down to size. After making my cuts, I took the legs off and spray painted them flat white by Rustoleum. Then I reattached the legs, measured how high I wanted my paint to go, and blue taped at the marks.

I brushed on a natural soft green for the 'dipped' color. And guess what? I really like these new little nesting tables!

SOLD

Anyone out there hot or cold on color dipping? I've warmed up to it.:) 

Thanks for stopping by! Coming up tomorrow is a refinished roadside find from last week.

~Chelsea

This post was originally featured under Chelsea's Garage, now affectionately known as StyleMutt.