Staging Smart: Why it's important ||Plus a fresh piece revealed||

Hi All! With each year that I've been refinishing furniture, I learn something big. Early on, it was basic refinishing techniques. Then I started to discover my own style, and began applying technique to a particular look. This past year what I learned had less to do with the process of refinishing a piece of furniture, and more to do with the community of those sharing the same passion. 

Cate and I are still in the process of building StyleMutt and are in no rush to achieve every last one of our hopes and dreams for this small business. It's a brick-by-brick process and we are OK with that. But, the first thing we wanted to accomplish together was defining what StyleMutt would be. We desire for StyleMutt to be a helpful resource to its readers; a welcoming place to find inspiration, tips & tricks, and enjoy being a part of a community with similar interest.

With the furniture refinishing boom growing more popular each year, we see even greater importance in pulling together to share helpful information. Rather than simply share the 'Before + After' photos of newly refinished pieces, we'd like to share new tips and techniques that we're learning as well. There is a lot of information for how to refinish furniture floating around the web, but we'd like to extend our focus to include how to refinish, market and sell your furniture, if that is what you desire to do. With so many talented creatives refinishing and selling furniture, it can be difficult to make your work stand out and move your inventory at a comfortable pace. We have by no means perfected how to market and sell our pieces, but together we have sold around 225 pieces over our combined 7 years of experience, and have learned a few significant things that we feel help our pieces move.

To begin, we'll be using a few posts to discuss staging, starting today!

One of the most important things you can do for a piece you've put time and work into is show. it. off. Bring it inside wherever you feel you have the best lighting, and create a beautiful scene around it. Careful not to let the piece get 'lost', but don't be afraid to add a lamp, a stack of books, a vase of pretty flowers - simple items that help show your piece in context. I specifically like to show versatility with pieces I refinish. A dresser can serve as an entryway catchall, or a dining room buffet. A console table can function as a desk. Try staging your piece a couple different ways to show potential buyers that your piece would be a multi-purpose investment for their home. 

Here is an example of a piece hot out of the garage and currently available for sale, that I staged two very different ways:

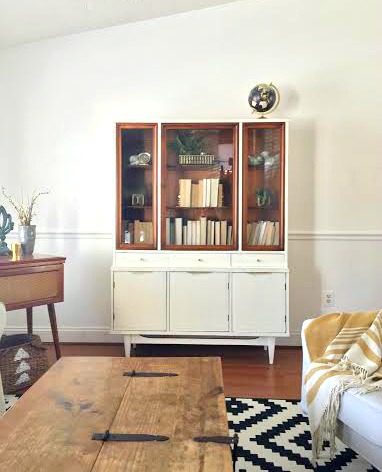
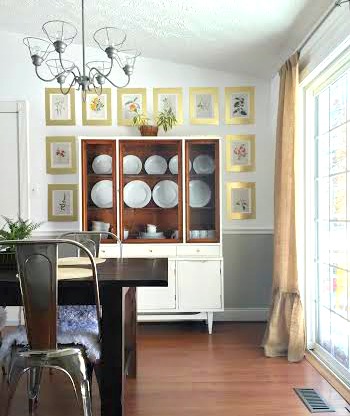
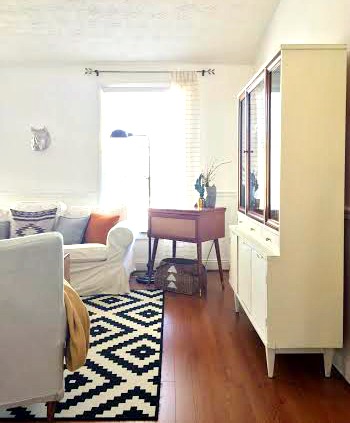
This mid-century modern china cabinet could serve as a library in a study or living room, or as a traditional dining room storage piece. Help potential buyers to see value in versatility. Don't you? I know for me personally, I'd rather put my money into something that I could move around and use differently someday, rather than something that's going to be a one-trick pony forever. Take photos in both settings and share both when you post your piece to sell! 

Here is the mid-century cabinet in my living room:

mcm cab1 DONE.jpg

And in the dining room:

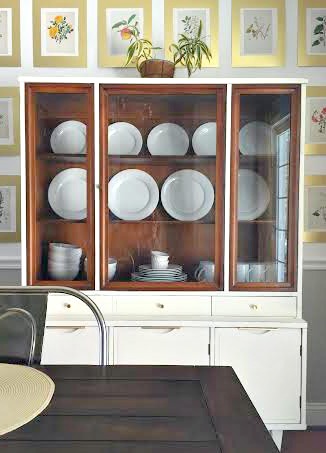
And don't forget the close-ups so folks can see the details that give your piece additional character!

It's can be difficult to imagine how a piece of furniture might look in your home or where you'd place it, especially if you're only looking at pictures of a piece in someone's garage or sitting on their driveway. Make it easy for people looking at pictures of your piece to really see its potential. Proper staging and a dash of versatility, (when possible), go a long way. It takes effort, yes, but if you feel your piece is worth $X, take the time to make it LOOK worth $X! If it doesn't look fantastic in your pictures, it will be hard to convince people to take the time to see it in person. Just my two cents. :)

Two-Tone Mid-Century China Cabinet
SOLD
Please contact chelsea@stylemutthome.com if interested in a something similar!

Thank you all so much for stopping by! Have a wonderful day!

Industrial Pipe Shelves ||Reveal + Tutorial||

Hi, All! I'm thrilled to finally be sharing this crazy fun and super big project with you today! If you're an Instagram friend then this post might be a little anti-climatic since I've been sharing pictures of these shelves for the past couple months. I decided to wait until after the holidays to post about our new industrial build, so we've had a bit of time to grow into it. You may have seen pipe shelves before - I've seen folks build small ones in bathrooms, as well as over entire walls as more of a 'built-in' look. Here is our version of these fabulously industrial shelves:

Aren't they rad?! We previously had a china cabinet on this wall which I enjoyed refinishing in a beautiful Duck Egg blue. But, as the kids got a little older it wasn't a practical piece for us and I needed way more open storage. I shared a few inspiring pictures of industrial shelves with Matt, he loved the idea, and we got to work almost right away! Building this was WAY easier than I had expected, and I'm going to show you how right now!

Let's have some fun, shall we?

First, we measured our wall and created this digital design of what we wanted to build. I wanted room at the bottom shelf to slide a stool or two under to use as a make-shift desk for our kids.

Then it was time to gather the supplies! I kid you not, gathering all the pipes and pieces for this project took longer than the actual build. I highly recommend calling your designated hardware store ahead of time and asking them to check their stock of each piece! Here's what we came home with:

Supplies pictured above:
3 x 24" 1/2" pipes
3 x 18" 1/2" pipes
3 x 14" 1/2" pipes
24 x 12" 1/2" pipes
3 x 10" 1/2" pipes
18 x 1/2" elbows
16 x 1/2" tees
6 x 1/2" flanges
Supplies not pictured above:
5 x 60"x16"x1" Pine Panel Boards
7/8" hole saw bit
Wood Stain for the boards, (we used Kona by Minwax)
Metallic spray paint for the pipes, (we used Rustoleum Oil Rubbed Bronze)
Lysol wipes to clean the pipes

TOTAL COST FOR ALL SUPPLIES: Just under $450

Once you have all of your supplies home, you'll want to clean the grease and oil off of the pipes before you spray paint them. Just give them a good wipe down with Lysol wipes, let dry, then spray them. Once the pipes are dry, it's time to build! Work from the floor up:

Following our digital design, we just started threading everything together like a good old fashioned erector set! At this point we have not screwed anything into the wall or floor. The pipes and fittings were screwing together so tight and were so incredibly sturdy, there was no need to anchor anything until we got up to the very top.

The panel boards, which we pre-drilled the holes on, just slid right over the vertical pipes, and rested on the horizontal 12" pipes with the elbow supporting the side closest to the wall.

Once we got to the top, (and again, at this point nothing is anchored to the floor or wall, but the sheer weight and tightness of it all kept it so sturdy), we used 3 x 14" pipes threaded into the top three elbows, (seen in the picture below without the pipes), and then threaded the other end of the 14" pipes into the flanges. We then screwed the flanges directly into the wall for additional security. The bottom flanges are just sitting on the floor, not screwed in. It's really not necessary once you see how sturdy the structure is.

A view of the finished product from the middle. It really was a quick build! The prep work took a bit of time, (gathering the supplies, cleaning and spraying the pipes, staining both sides of the boards and drilling the holes), but the actual structure went up pretty quick!

These shelves have been so much more functional for us. The bottom shelf is completely stocked with kids' activities and supplies and now that they're out in the open, we are doing way more activities together. That is such a gift in and of itself!

I hope if you ever want to give these shelves a go that this tutorial is helpful for you! Please don't hesitate to ask any questions you have! One discovered bonus to these shelves versus actual built in shelves is that these are transportable! If we ever move from this home, we'll be able to bring these with us, (and we can always add on if need be).

Thank you so much for stopping by and have a wonderful weekend!


A Flipper's New Years Resolutions

Happy New Year!  So as we know in this culture, January has a way of
1.  Making you feel guilty about where you are in life/ size/ relationship status and
2. Forcing you to think about where you want to go next

Well I'm not immune to these tendencies, but this year I don't want to look at myself and critique what I see or don't see.  My parent's always said that marriage would be my declaration of independence.  That's not to say they would cut me off, but that they would step aside as my primary support system and let my husband and I figure it out - finances and all.  In 2014, I married a wonderful man but we quickly had to face the ugly adult truth that being all grown up and on your own is hard.  Bills seem bigger when you're not living in a house crammed with a ton of roommates to help split the rent.  It's just the two of us in a studio apartment {three plus Thor - but cuteness don't pay the rent}.  And let me tell you, leaving and cleaving is much more dramatic when you're adjusting to one ministry salary and the other spouse only works part time.  But since 2015 has already descended and my first wedding anniversary approaches on Jan 18th, I am nothing but grateful for this past year.  I am truly thankful for Every. Last. Hardship.  

I have a board on pinterest I call "Furniture Flip Bucket List" and it is exactly that - a jumbled collection of inspiration and unorganized thoughts.  I decided that today I want to go ahead and claim a couple items on that board that I want to see myself tackle in 2015.  This is not meant to be a list of New Year's resolutions that will make me feel empty if I don't cross a single thing off my list.  This is simply meant to be my declaration of what's on my DIY radar this year. 

No.1: Build my own bakers rack or industrial cart

I have always one of these ever since I saw Chelsea's wooden backer's rack which she uses a living room bookshelf.  And then over Thanksgiving, I caught myself drooling over her mom's industrial shoe rack which she uses to display her collection of serving platters.  So after tediously noting how the metal and wood shoe rack was constructed, I started thinking what if I build my own from scratch?  You'll be the first to find out how it goes ;)

No.2: Recreate this surface effect with wood shims

Source:  The Rycotewood Furniture Centre at OCVC

Source:  The Rycotewood Furniture Centre at OCVC

Shimnoun   thin strip of material used to align parts, make them fit, or reduce wear.  

At first glance, a shim looks like a simple strip of wood or even a paint stick.  However, upon closer look it has one end slightly thicker than the other.  Although the quality of wood is not a polished as the inspiration photo, I still think it would be a cool uneven surface treatment for a two-toned mid-century modern look.

No.3: RIVET SOMETHING! 

Source: Sarah M. Dorsey Designs for Infarrantly Creative

Source: Sarah M. Dorsey Designs for Infarrantly Creative

Riv·etnoun  a short metal pin or bolt beaten out or pressed down used for holding together two plates of metal.

Guys!  Guess what?!?  I got my first riveter for Christmas!  My inspiration photo used rivets to fasten this awesome trunk table base, but really, the possibilities are endless I just need the perfect occasion to break it in.  Any ideas?

No.4: Refinish a dresser in a velvety navy with gold glam hardware

I fell in love with this photo when it popped into my pinterest feed.  The source article was advertising a newer paint product called Velvet Finishes by Kellie Smith which I would love to try one day.  However, I also believe I can get this effect without the trouble of special ordering a mysterious new paint.  We'll have to see how my hypothesis turns out...

No.5: Figure out the cheapest way to DIY a pull down chart IN COLOR

I just plum LOVE these pull-down charts.  I made my own  equestrian and architectural faux pull-down charts with big, cheap engineer prints that {alas} only come in black and white.  This year, I would like to find out the cheapest/ largest way I can DIY a pull-down chart in vivid colors. 

No.6: Un-retire my shabby chic side and do a stripped-paint dresser finish

When I first started acquiring furniture, I was all about the Shabby Chic look.  I had chipping window frames, gilded mirrors, drawers with crystal knobs, and I was obsessed with white distressed furniture.  

Last year I saw this stripped cabinet at a thrift store and was re-reminded of why I love about this look.  Unfortunately it was for display only {#$%^!} but I did not dismay - I just added it to my bucket list and hope to make it happen this year!

No.7: Turn a barstool or swivel seat into a modern accent chair

Source: West Elm

Source: West Elm

Not everyone needs a barstool, but almost everyone can find a use for an accent chair.  I would love to find a barstool or swivel chair like this inspiration photo and see if I can switch out the swivel for some tapered legs and turn it into a mid-century modern gem.  


So there you have it readers - you may hold me accountable to my list this year.  However, I am determined to have no regrets for how any of these projects turn out or if I ditch my resolve in favor of some new idea I have yet to hatch.  Mk?  Mk.  

I'll catch you on the flip side (see what I did there ;)

Got some ideas of your own you want to tackle?  Or have some advice on how I can take on these Flip List items?  Dare to share 'em with us here or on facebook or instagram!