Dippin' into color

Hi guys! Today I wanted to share about a recent trend that I've had mixed feelings about; color dipping. It's a painting technique that I've seen used on small items such as mixing spoons, to larger pieces of furniture.
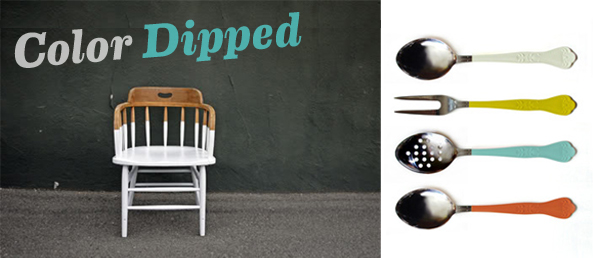
Source: Kick

Source: Kick

I like it much better on the spoons than on that chair. I see that chair and just feel like it's incomplete. Ha! Nevertheless, it is a trend that is hard to ignore right now, especially in my line of work with refinishing furniture. I love seeing other techniques being done even if they're not my personal style. 

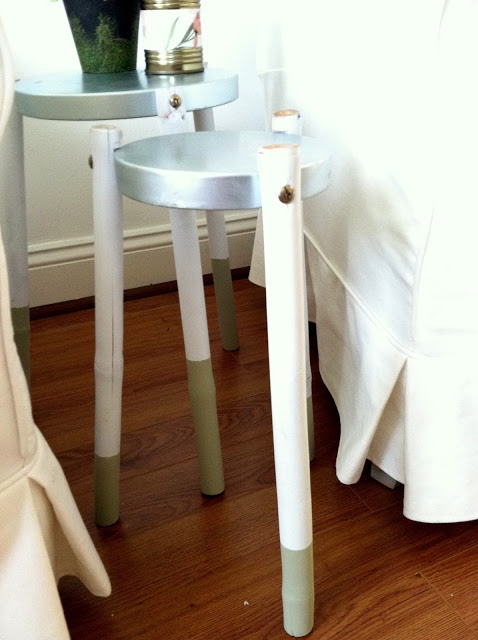
I decided to give color dipping a try for myself. Even though I've been mixed about the look, the technique itself still seemed fun! I may not have tried it if I didn't have just  the perfect piece: A bamboo and metal plant stand that I got from Goodwill over 3 years ago and never really used. It occupied a couple lonely corners of our home here and there until settling nicely into the garage for the last year or so to collect cobwebs.

I had always thought this bamboo plant stand would be much more functional if converted to a couple nesting tables. So I grabbed a hand saw and cut it down to size. After making my cuts, I took the legs off and spray painted them flat white by Rustoleum. Then I reattached the legs, measured how high I wanted my paint to go, and blue taped at the marks.

I brushed on a natural soft green for the 'dipped' color. And guess what? I really like these new little nesting tables!

SOLD

Anyone out there hot or cold on color dipping? I've warmed up to it.:) 

Thanks for stopping by! Coming up tomorrow is a refinished roadside find from last week.

~Chelsea

This post was originally featured under Chelsea's Garage, now affectionately known as StyleMutt.

Dining Room Makeover, Phases 3 and 4 = Done!

Today's post covers the high and low of painting; literally! Completing our dining room makeover was painting under the chair rail and then our chandelier. I know painting is not that fun of a task for most folks, but once you set aside a morning or afternoon and just dooo iiiit, oh my goodness, the feeling is awesome!

First, here is where we left off with phase 2, (which was replacing the dining set after we sold our old set):

Phase 3: Painting under the chair-rail 

We chose the color Travertine by Valspar at Lowes

I especially love where it meets the soft minty aqua color of our kitchen! So fresh.

After I painted under the chair rail I was a hair away from dancing around our dining room and calling it done. Well, calling it done at least....the dancing part happens daily. Usually when I start getting impatient in my chair waiting for my kiddos to finish a meal.

Anyways, I loved the whole crisp and industrial look we had achieved, but knew I wanted the chandelier to be something funkier than it was....which brings us to Phase 4!

I spent some time researching clever chandelier makeovers since I wanted to keep the perfectly functional one we had rather than buying something else. While I did find lots of really cool before and afters, nothing was really what I was envisioning for our dining room. It needed to be vibrant, off beat, original, and youthful. My husband and I are, (for now), still in our 20s, and I wanted this space to reflect the playfulness of our young family. 

Here is what I came up with: Splattering paint!

This was one of the most fun and easy home projects yet! I climbed onto the table and removed each frosted glass globe from our chandelier. After a good cleaning I turned each one over and placed a bit of blue table over the hole.

Then I filled a cheap spray bottle with my paint and added a tiny bit of water:

Next I just messily sprayed around the globes until they were evenly covered with splattered and drippy paint.

Finished product, finished dining room!

Thank you all for walking through our dining room makeover with me and have a wonderful weekend!

~Chelsea

This post was originally featured under Chelsea's Garage, now affectionately known as StyleMutt.

Dining Room Makeover, Phase 1 and 2

Before I took the month of August off from blogging, I wrote this post about our first change in the dining room: the gallery wall! At the risk of being repetitive, here is the before and after in case you missed it:

Before

After

Though I didn't blog for a month, I moved right onto the next phase of our dining room makeover - selling our old dining set and purchasing the new!

The table is the Garner Extension table from World Market, and the gun metal chairs are the Remy side chair from Restoration Hardware. When we decided on this table from World Market, I registered to be a 'member', just to get the 10% off coupon. For whatever reason, the cashier gave us 15% off. Didn't ask, didn't look back. At the moment, this table is on sale. Also, the Remy side chair from RH is on sale and is currently the best price for that style chair that could possibly be found, (we made it our mission to find that style as inexpensively as possible). An unbeatable, decent price at RH...guess anything IS possible!

The aqua blue china cabinet is one of my all time favorite pieces that I had the pleasure of refinishing about a year ago. I painted the piece in Duck Egg by Annie Sloan Chalk Paint, and spray painted the caging on the doors as well as the hardware in flat black Rustoleum spray paint. Matt built the shelves for the piece since they were MIA when I bought the piece, (used on Craigslist), and I painted those, as well as the inside of the piece, in Duck Egg. The piece is heavily distressed and is such a fun punch of color on our main floor. That piece, and our burlap curtains, (from Simply French Market on Etsy), are the only two things that did not change during our dining room makeover.

I wanted to shake things up with our arm chairs and found these two solid oak chairs on Craigslist at an amazing price:

Before

After 

I dry brushed Old White by ASCP using a thick bristle brush, then used fine steel wool to distress the spindles and a fine sanding sponge to distress everywhere else. I love the contrast of these warm distressed oak chairs with the sleek and modern metal chairs.

Thank you so much for reading! Tomorrow I'll wrap up our dining room makeover with the final details!

~Chelsea

This post was originally featured under Chelsea's Garage, now affectionately known as StyleMutt.