A simply beautiful Thanksgiving table

We are hosting our first Thanksgiving ever this year! I am just so excited to spend this special holiday with some of my favorites. That has actually been at the forefront of my excitement and I have hardly given a thought as to how to decorate the table...until now.

Every memory I have of Thanksgiving day is of the people I spent it with. No where in my recollection do I have any idea what the table center pieces have ever looked like, what the turkey looked like or how big it was, how many desserts there were. Nope. None of these things have 'stuck'. What has stuck are my memories of shared conversation and laughter, bad jokes, good jokes, reminiscing about older days, sharing hopes and dreams of days to come, and the faces of those nearest and dearest to my heart. My hope for our Thanksgiving table is that these very things will be at the heart of our meal shared together. This means no over the top table decorating that requires ducking under or leaning around to see the person across from you!

~I think Norman Rockwell got it right.~

For some real life inspiration, I have found the following tables to be along the lines of what I would want our Thanksgiving table to look like:

~I love the soft beauty of this spread! Some cranberries sprinkled loose on the table and some large mason jars filled with berries and pine cones give this table just a hint of color~

Table by French Larkspur

~Simple place settings complete with a piece of fruit and just a couple candles at the center. Not over the top but definitely not dull~

Table by Spartan

~A colorful leaf at each place setting pumps up the festive mood of this table. Berry vine wrapped votives on either end add a touch of elegance~

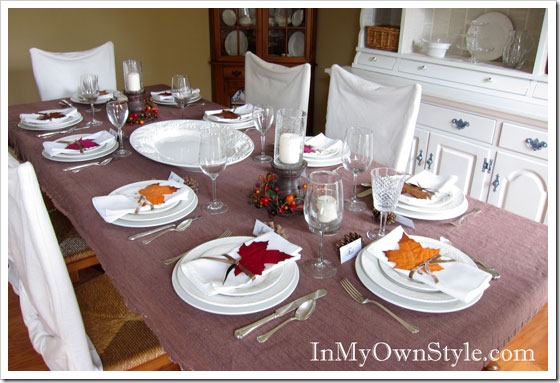
Table by In My Own Style

~What a creative idea! This quilted table runner is a fun way of adding color without cluttering the center of the table~

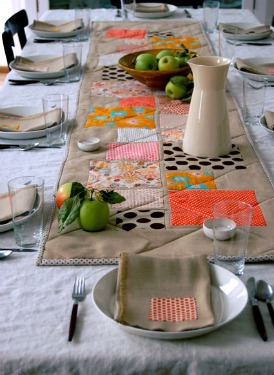
Table by Inspiring Lovely

~This is such a breath of fresh air! This spread is sparse on color, (the only color is the beautiful pattern on the china), but full of elegance. The crystal glasses and silver candle stick holders add a bit of sparkle, setting this meal apart from any other~

Table by Jenny Steffens

~I was so drawn to the understated allover print of this table cloth and the blue iridescent goblets holding the nuts. Though the color tones are on the cooler side, this setting still feels cozy to me. Plus, once the food is served and the plates are full, I'm sure the coziness is just amplified.~

Table by Julie Blanner

~Now this is a kids table I would definitely feel honored to sit at! How adorable. My kids may be a bit too young to have their own table this year, but I will definitely tuck this idea away for the future! Fun, fun. Reminds me of Thanksgivings when I was young, sitting shoulder to shoulder with my cousins, eating, laughing and getting into mischief.~

Table by Cottage and Vine

Well, the wheels are spinning and I think I have some ideas for how to amp up our table for Thanksgiving. It could be bare for all I care, as long as I get to sit around it with some of our loved ones...but ya know, I gotta impress grandma. ;) Hi, Grandma Livi! xoxo

~Chelsea

This post was originally featured on Chelsea's Garage, now affectionately known as StyleMutt!

DIY Lamp shade makeover - block printing!

Hello! I finally bit the bullet and tried my hand at block printing!

It's a craft I have been admiring for several months now and have seen some amazing projects transformed through this unique skill. There are several more block printing projects on my list, (including recovering some dining chairs for the next Chelsea's Garage sale!), but I thought I would break the ice with our bedroom lamps!

Our lamps have looked like this for about 2 years and I have really enjoyed them!

After seeing a lamp decorated like this at Lucketts Antiques in Leesburg, VA, I couldn't wait to try it on our bedroom shades. I just tied a strip of burlap around the entire shade and knotted it with a strip of white linen and silvery tulle. It's been a nice little 'Country Living' touch in our bedroom....but I've been over it for a little while and ready for a change. 

Our shades, stripped of their burlap band, ready for their makeover. As you can see our room is very light and airy....and also full of solids. While our bed does have lots of different fabrics and textures, it is still solid white. Our walls are solid, lamp shades are solid - we need some print!

I definitely have wanted to add a punch of black in our bedroom and this seemed like a good opportunity to do so. I love seeing little black accents in even the lightest of rooms. I found these shades online to be inspiring!

Euro Style Lighting

Kaboodle

Euro Style Lighting

Target, Room Essentials

Lamps Plus

Mysoti

After looking around I realized I was not drawn as much to the precise prints. I don't like perfection in my home. I like things just a little 'off'. Clean, precise lines are not for me. I really like the faded look, as in the last shade by Mysoti.

Our bedroom is soft and calming to me and I didn't want to have anything too harsh by my head at night :) Just something different, interesting, and a little imperfect. I started this project with no exact idea in my head of what I wanted our shades to look like. It was one of those moments where I just threw caution to the wind and started applying paint on our lamp shades without a care in the world. And boy, was it fun! 

Supplies:

-Lamp shades

-Black paint, (I used Craftsman acrylic paint from Michaels that I had on hand)

-Paper plate to make a puddle of paint for dipping your object in

-Any cool designed object you want! I have a pile of tin cookie cutters and used the inside and outside of the diamond shape one. You can use regular ink stamps, stencils, whatever your heart desires

Step 1:

Pour a 'glop' of paint on your plate and then swirl it around so it makes a good size 'puddle', (you don't want it too thick and you want the paint evenly spread out). Then evenly coat your design object, (in my case, the diamond cookie cutter)

Step 2:

Firmly press your design onto your project. Reapply paint after each press...If you are using an object with more surface area than, say, a cookie cutter, make sure you remove a bit of paint before applying to your project so it's not too thick, runny or clumpy.

After finishing this overall diamond design on one shade, I stood back and looked at it, even stuck it back on in our bedroom. After just a couple minutes I decided it needed more...

So I went back over with the inside of the diamond cookie cutter, which is a smaller diamond shape.

...Ah, yes. Much better :)

Definitely not over the top or bold in any way. But the overall pattern is just the touch I was looking for in our bedroom. It was the easiest project ever and one I am excited to try again soon on some other things!

Thank you for reading! Stay tuned for a super fun giveaway coming up soon :) I can't wait!

~Chelsea

This post was originally published on Chelsea's Garage, now affectionately known as StyleMutt!

Paper wreath tutorial

Hi friends! What an interesting last few days we have had at our house! Starting last Wednesday night every person in my family, (myself included), caught some sort of bug/flu over the following 5 days. Yuck! Then, overlapping the flu, we were hit with hurricane Sandy! We are very fortunate to have absolutely zero effects from the storm on our home or property. Every time I flip on a light, take a shower, feel the warmth of the heat, or simply zap something in the microwave, I am so grateful that the Lord protected us. There are many who have suffered/are suffering from this great storm and my thoughts and prayers go out to them.

While we have been counting our many blessings, we have also been looking for things to pass the time inside as we haven't left the house in 5 days! The kids have reaped the benefits of my cabin fever as I have bent some rules just to keep things interesting. I piled our main floor furniture against the walls and on top of the dining table and brought their bikes inside so they could race around like a mini biker gang. We've taken apart our basement sectional to make a massive fort! I took real food down to the kids play kitchen that they got for their birthday so they could pretend they were actually cooking and serving, (a mess that I fully anticipated, enjoyed in the moment, and hated cleaning up). Yes, the kids have been busy and quite enjoying themselves!

To relieve my own cabin fever, I decided to make a paper wreath during the kids' nap time yesterday!

This wreath will be donated for a silent auction that will benefit a fantastic cause supporting education for underprivileged kids in Washington D.C., (please see info here - totally worth a few seconds to check out). It's the second wreath I've made like this but the first time I've photographed the process so you can try it yourselves!

Supplies:

-2 books of slightly different colored pages for a bit of contrast in your wreath

-Stapler

-Craft glue

-Black paint & small brush

-13"-14" foam wreath frame

Step 1:

Paint the outside of the pages of your books black. This will give each individual page of your wreath a little punch so you can see the contrast

Step 2:

Tear out pages one by one and shape into a cone. Staple the ends. I make the outer edge of cones on the wreath like this....

...then I make all the other 'layers' of cones in the wreath like this, with a double fold at the bottom of the cone.

Step 3:

Drag a strip of glue across the bottom of your cone

Step 4:

Stick the cone on your wreath frame, tucking in each cone one next to the other, working from the outside of your frame towards the inside. When you are starting a new 'layer', make sure you are tucking the cones in close to the previous layer so you don't have bare spots.

*As you work your way in, your cones will start facing the inside of the frame, as you can see in this picture. Once it looks like you can no longer see much green of the frame, do one final layer just as you have been doing, but face the cones outward. I tried to get a couple pics of what I'm talking about...look at the inside of this wreath - you can see how the very inside cones are facing out, and the layer of cones above them are facing in.

Your beautiful final product!

This is one of my absolutely favorite DIY projects. I got my books at a thrift store for pennies a piece, the black paint and glue I already had here at home, (but you can purchase them at Michaels for just a few bucks), and the wreath frame was around $10 at JoAnns Fabrics, (they are a few bucks more at Michaels, around $13, I think). So it's a very inexpensive project that looks like a million bucks when it's finished! Well, maybe not a million...but definitely classy and elegant, (in my opinion).

Have you done any fun projects from home recently? Or seen any cool ones you'd like to try?

~Chelsea

This post was originally published on Chelsea's Garage, now affectionately known as StyleMutt!