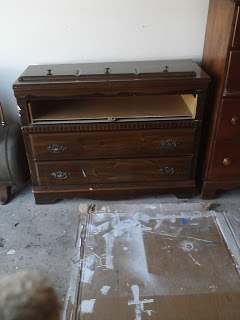
What a fantastic weekend! On Saturday my sis in-law, her 18mo old daughter, and my girl, Shire, (2yrs), headed up to PA for a beautiful bridal shower in honor of one of Husband's gorgeous cousins. It was wonderful being surrounded by so many generations of women and having some much needed girly time with my sweet daughter. When you're normally outnumbered by boys it's amazing how refreshing it can be to get away with your own kind :) I stayed up until 3am on Saturday just chatting away! I don't know about the other girls but I devoured every minute. Here are some pictures from the memorable occasion:


On to some business. I wanted to share a couple very small, easy and cheap, (if not free), DIY decor projects to add a little jazz to your home. This time of year many of us are just aching for Spring to come and if you're anything like me, a few little fun projects in the home are necessary to make the last couple months of winter a bit brighter. Aside from constantly moving my furniture around, bringing new refinished pieces in and photo shooting them, and baking up a storm like I'm Betty Crocker, I also really like the little things I can do to add a small, but interesting, statement to a room or centerpiece.
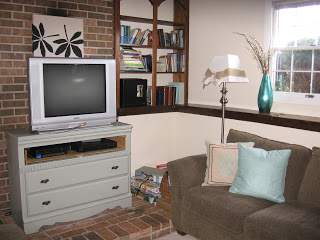
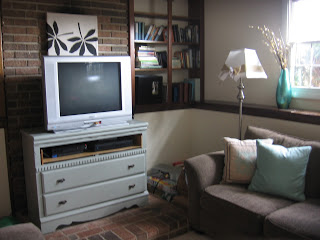
Let's start with lamps. About a year ago I was walking around Lucketts Antique Store in Leesburg and saw a very small little white lamp tucked back into a corner. It was completely ordinary except for that the lamp shade was wearing what looked like a fun headband, but for a lamp! I almost bought this sweet little thing but decided to leave it there and take home some inspiration instead. At Joann's the next day I bought supplies to make my own version of what I saw: burlap, (you can use fabric or ribbon), white linen, and nylon, (any color- I bought silver and peach). Check the sale shelves. Everything I needed was there for just a couple dollars, and I still have plenty left to make more! I cut about 3" wide strips of burlap, long enough to tie in a big knot around the middle of my lamp shade. Then I cut a strip of linen, (unmeasured and uneven), and a strip of nylon, (unmeasured and uneven) and tied those into the knot of burlap. Now it adds a bit of interest and texture against the all white bedding and shelves!


At my sale 2 weeks ago I had numerous inquiries about my lamps which I had out just for some mood lighting, but they were not for sale. I will definitely be selling this at my next sale since they sparked a lot of interest!


Next order of business is filling vases with faux flowers. If you go to Michaels or A.C. Moore, they have entire walls of rocks, glass beads and sand in every color, not to mention moss in various shades of green; there is no shortage of ways to fill a vase around faux flowers. However, these items can be somewhat costly sometimes, or you might just have 3 young children whom you don't feel like spending 30 minutes loading up into the car and trying to keep relatively quiet as you navigate the impossibly narrow aisles of the craft store. ;o) Both of these reasons made me scratch my head and think about what I had here at home that I could use to fill a vase with faux flowers. Then it came to me: PUZZLES! Husband and I have a fantastic puzzle collection as we used to enjoy putting jigsaw puzzles together each winter BC, (Before Children). We haven't put a single puzzle together since having our babes, so what to do with our puzzles now? Pour one in a vase and show it off!


This was one of my favorite little decor ideas. We had only lived in our house for a few months and I had no budget $ left for various decor items I still wanted, (but really didn't NEED), for our home. It's free, it's interesting, it gets people talking and it 'goes' with any decor. Next time your puzzled about a centerpiece, crack open a puzzle!
More DIYs to come in the future but those might give you a little inspiration to get you through the week at least! :) Be sure to let me know if you try them out or have any other ideas regarding lamp decor or faux flower displays!
On to some business. I wanted to share a couple very small, easy and cheap, (if not free), DIY decor projects to add a little jazz to your home. This time of year many of us are just aching for Spring to come and if you're anything like me, a few little fun projects in the home are necessary to make the last couple months of winter a bit brighter. Aside from constantly moving my furniture around, bringing new refinished pieces in and photo shooting them, and baking up a storm like I'm Betty Crocker, I also really like the little things I can do to add a small, but interesting, statement to a room or centerpiece.
Let's start with lamps. About a year ago I was walking around Lucketts Antique Store in Leesburg and saw a very small little white lamp tucked back into a corner. It was completely ordinary except for that the lamp shade was wearing what looked like a fun headband, but for a lamp! I almost bought this sweet little thing but decided to leave it there and take home some inspiration instead. At Joann's the next day I bought supplies to make my own version of what I saw: burlap, (you can use fabric or ribbon), white linen, and nylon, (any color- I bought silver and peach). Check the sale shelves. Everything I needed was there for just a couple dollars, and I still have plenty left to make more! I cut about 3" wide strips of burlap, long enough to tie in a big knot around the middle of my lamp shade. Then I cut a strip of linen, (unmeasured and uneven), and a strip of nylon, (unmeasured and uneven) and tied those into the knot of burlap. Now it adds a bit of interest and texture against the all white bedding and shelves!
At my sale 2 weeks ago I had numerous inquiries about my lamps which I had out just for some mood lighting, but they were not for sale. I will definitely be selling this at my next sale since they sparked a lot of interest!
Next order of business is filling vases with faux flowers. If you go to Michaels or A.C. Moore, they have entire walls of rocks, glass beads and sand in every color, not to mention moss in various shades of green; there is no shortage of ways to fill a vase around faux flowers. However, these items can be somewhat costly sometimes, or you might just have 3 young children whom you don't feel like spending 30 minutes loading up into the car and trying to keep relatively quiet as you navigate the impossibly narrow aisles of the craft store. ;o) Both of these reasons made me scratch my head and think about what I had here at home that I could use to fill a vase with faux flowers. Then it came to me: PUZZLES! Husband and I have a fantastic puzzle collection as we used to enjoy putting jigsaw puzzles together each winter BC, (Before Children). We haven't put a single puzzle together since having our babes, so what to do with our puzzles now? Pour one in a vase and show it off!
This was one of my favorite little decor ideas. We had only lived in our house for a few months and I had no budget $ left for various decor items I still wanted, (but really didn't NEED), for our home. It's free, it's interesting, it gets people talking and it 'goes' with any decor. Next time your puzzled about a centerpiece, crack open a puzzle!
More DIYs to come in the future but those might give you a little inspiration to get you through the week at least! :) Be sure to let me know if you try them out or have any other ideas regarding lamp decor or faux flower displays!