Gel Stained Dresser | 2020 Flip List Item No.1

In this world of consumption, it grounds me to create instead. I think that’s probably why you’re here too is it not? To get inspired by what you can make out of the world’s sloppy seconds? Or open your eyes to what can be rescued from the dump?

Sometimes it feels like we live in what I call a “Disposable Culture”. Things aren’t really made well enough to last and it doesn’t matter anyways because you can instantly replace it on a whim. If there’s one thing this pandemic has taught me it’s that almost anything you want is available for delivery and on demand. But I wonder how our consumerism affects what we find value in. On the one hand, I can’t complain because I’m in the business of making things from what no one else wants. But on the other hand does the ease we can waste and replace lessen our concept of worth… and how far does that infection go?


Stories like George Floyd’s haven’t been lost on me. I couldn’t bring myself to watch the footage because I knew how wrong it was.

No person should be disposable.

As a middle-class white woman, I can’t say that I’ve felt the knee of the BIPOC struggle. And it’s a hard pill to swallow. My color automatically classifies me as a contribution to society. And not everyone is afforded that luxury.

I know, I know.  I don’t normally open up about such galvanizing topics here at SMH.  And if you came here for the furniture, I will get to that. It seems trivial to keep using this platform just to talk about design and not first acknowledge that. After all, it has been a true joy for me to find the value in what others may have dismissed.

Can’t we all try to do the same in each other?


Adjustments.jpeg

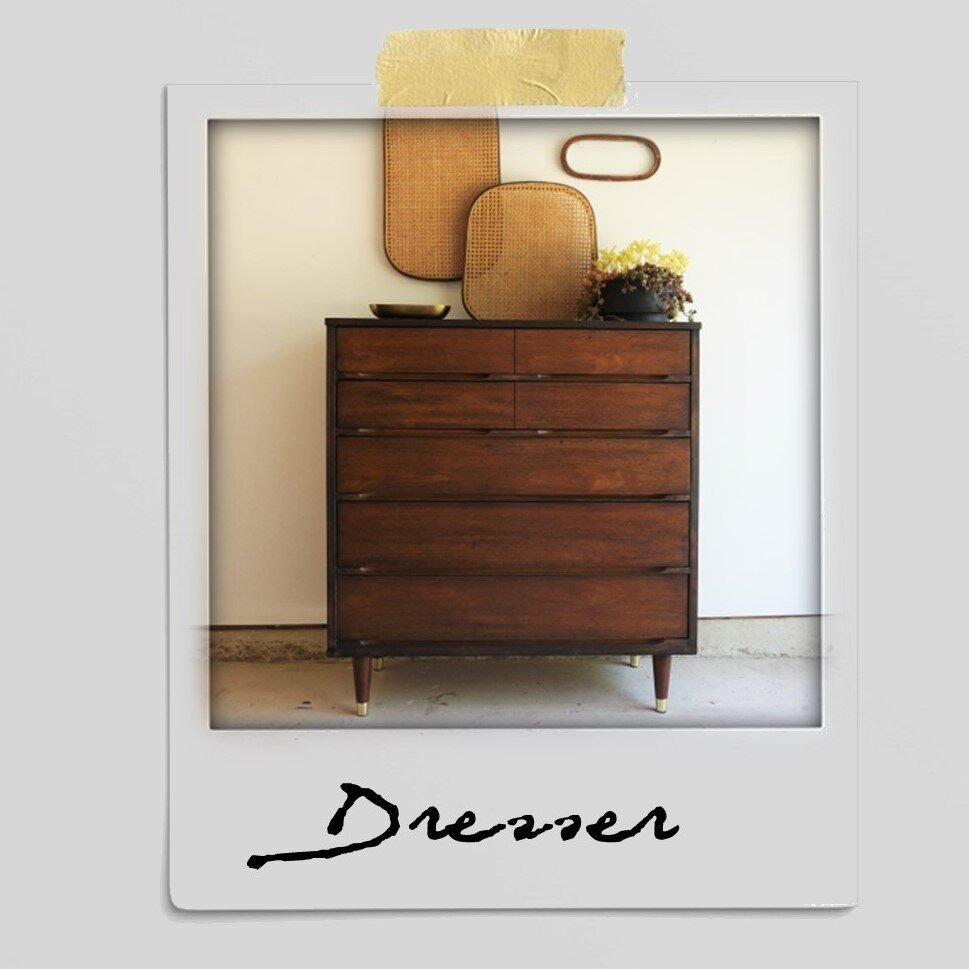
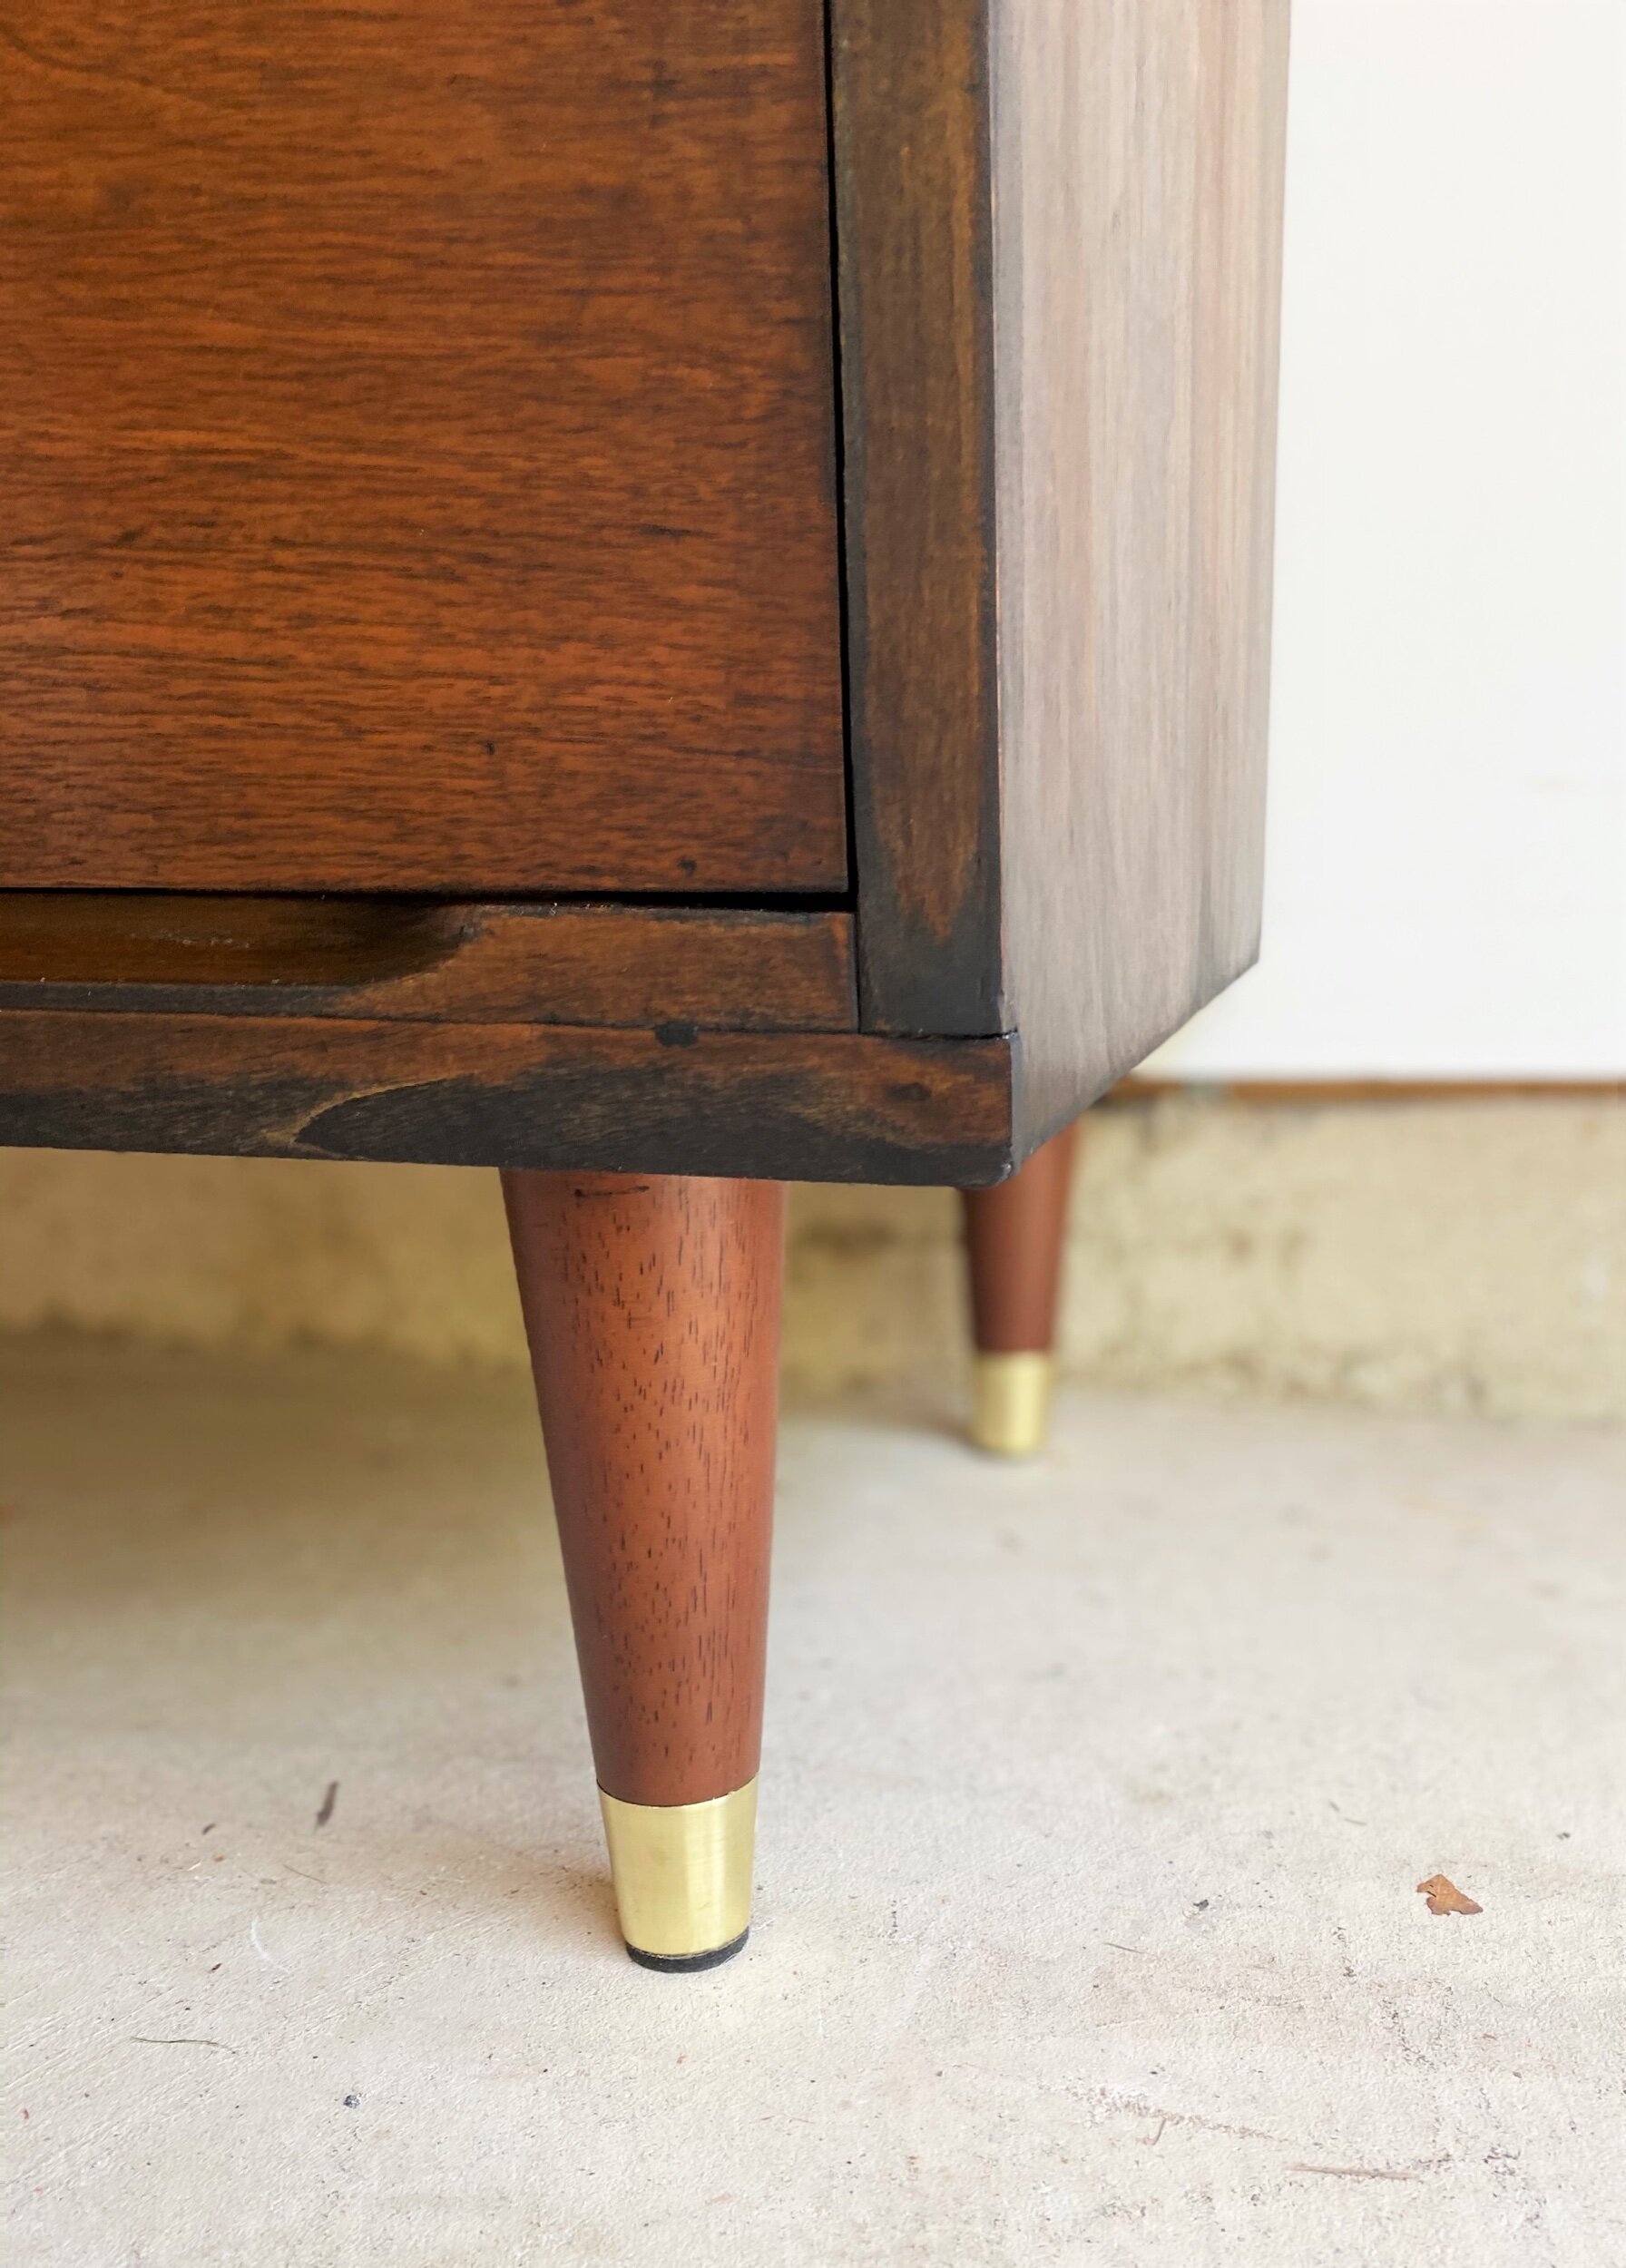
Last year, I stumbled across a free dresser on the Facebook marketplace. It was a little beat up. It was missing the original legs. And the family had no use for it because the daughter was tired of the family hand-me-downs. I wanted the chance to restore it so I scooped it up and hoarded it in the workshop for a few months, and eventually added it to the 2020 Flip List to hold myself accountable.


But like most things in 2020…

Things did not go exactly as planned.

Adjustments.jpeg

It was in overall good shape - I only had to add legs and repair some damage to the trim work. The wood grain was so beautiful that I didn’t want to do my usual finish. But the location of the repairs would make it tricky to match the original walnut stain. I still love to play with contrast in details so I decided to try gel staining for the first time. I chose a black stain that I hoped would allow me to mask the compound repairs on the trim while darkening the wood grain instead of loosing it to a flat paint finish.

IMG_0117.jpeg

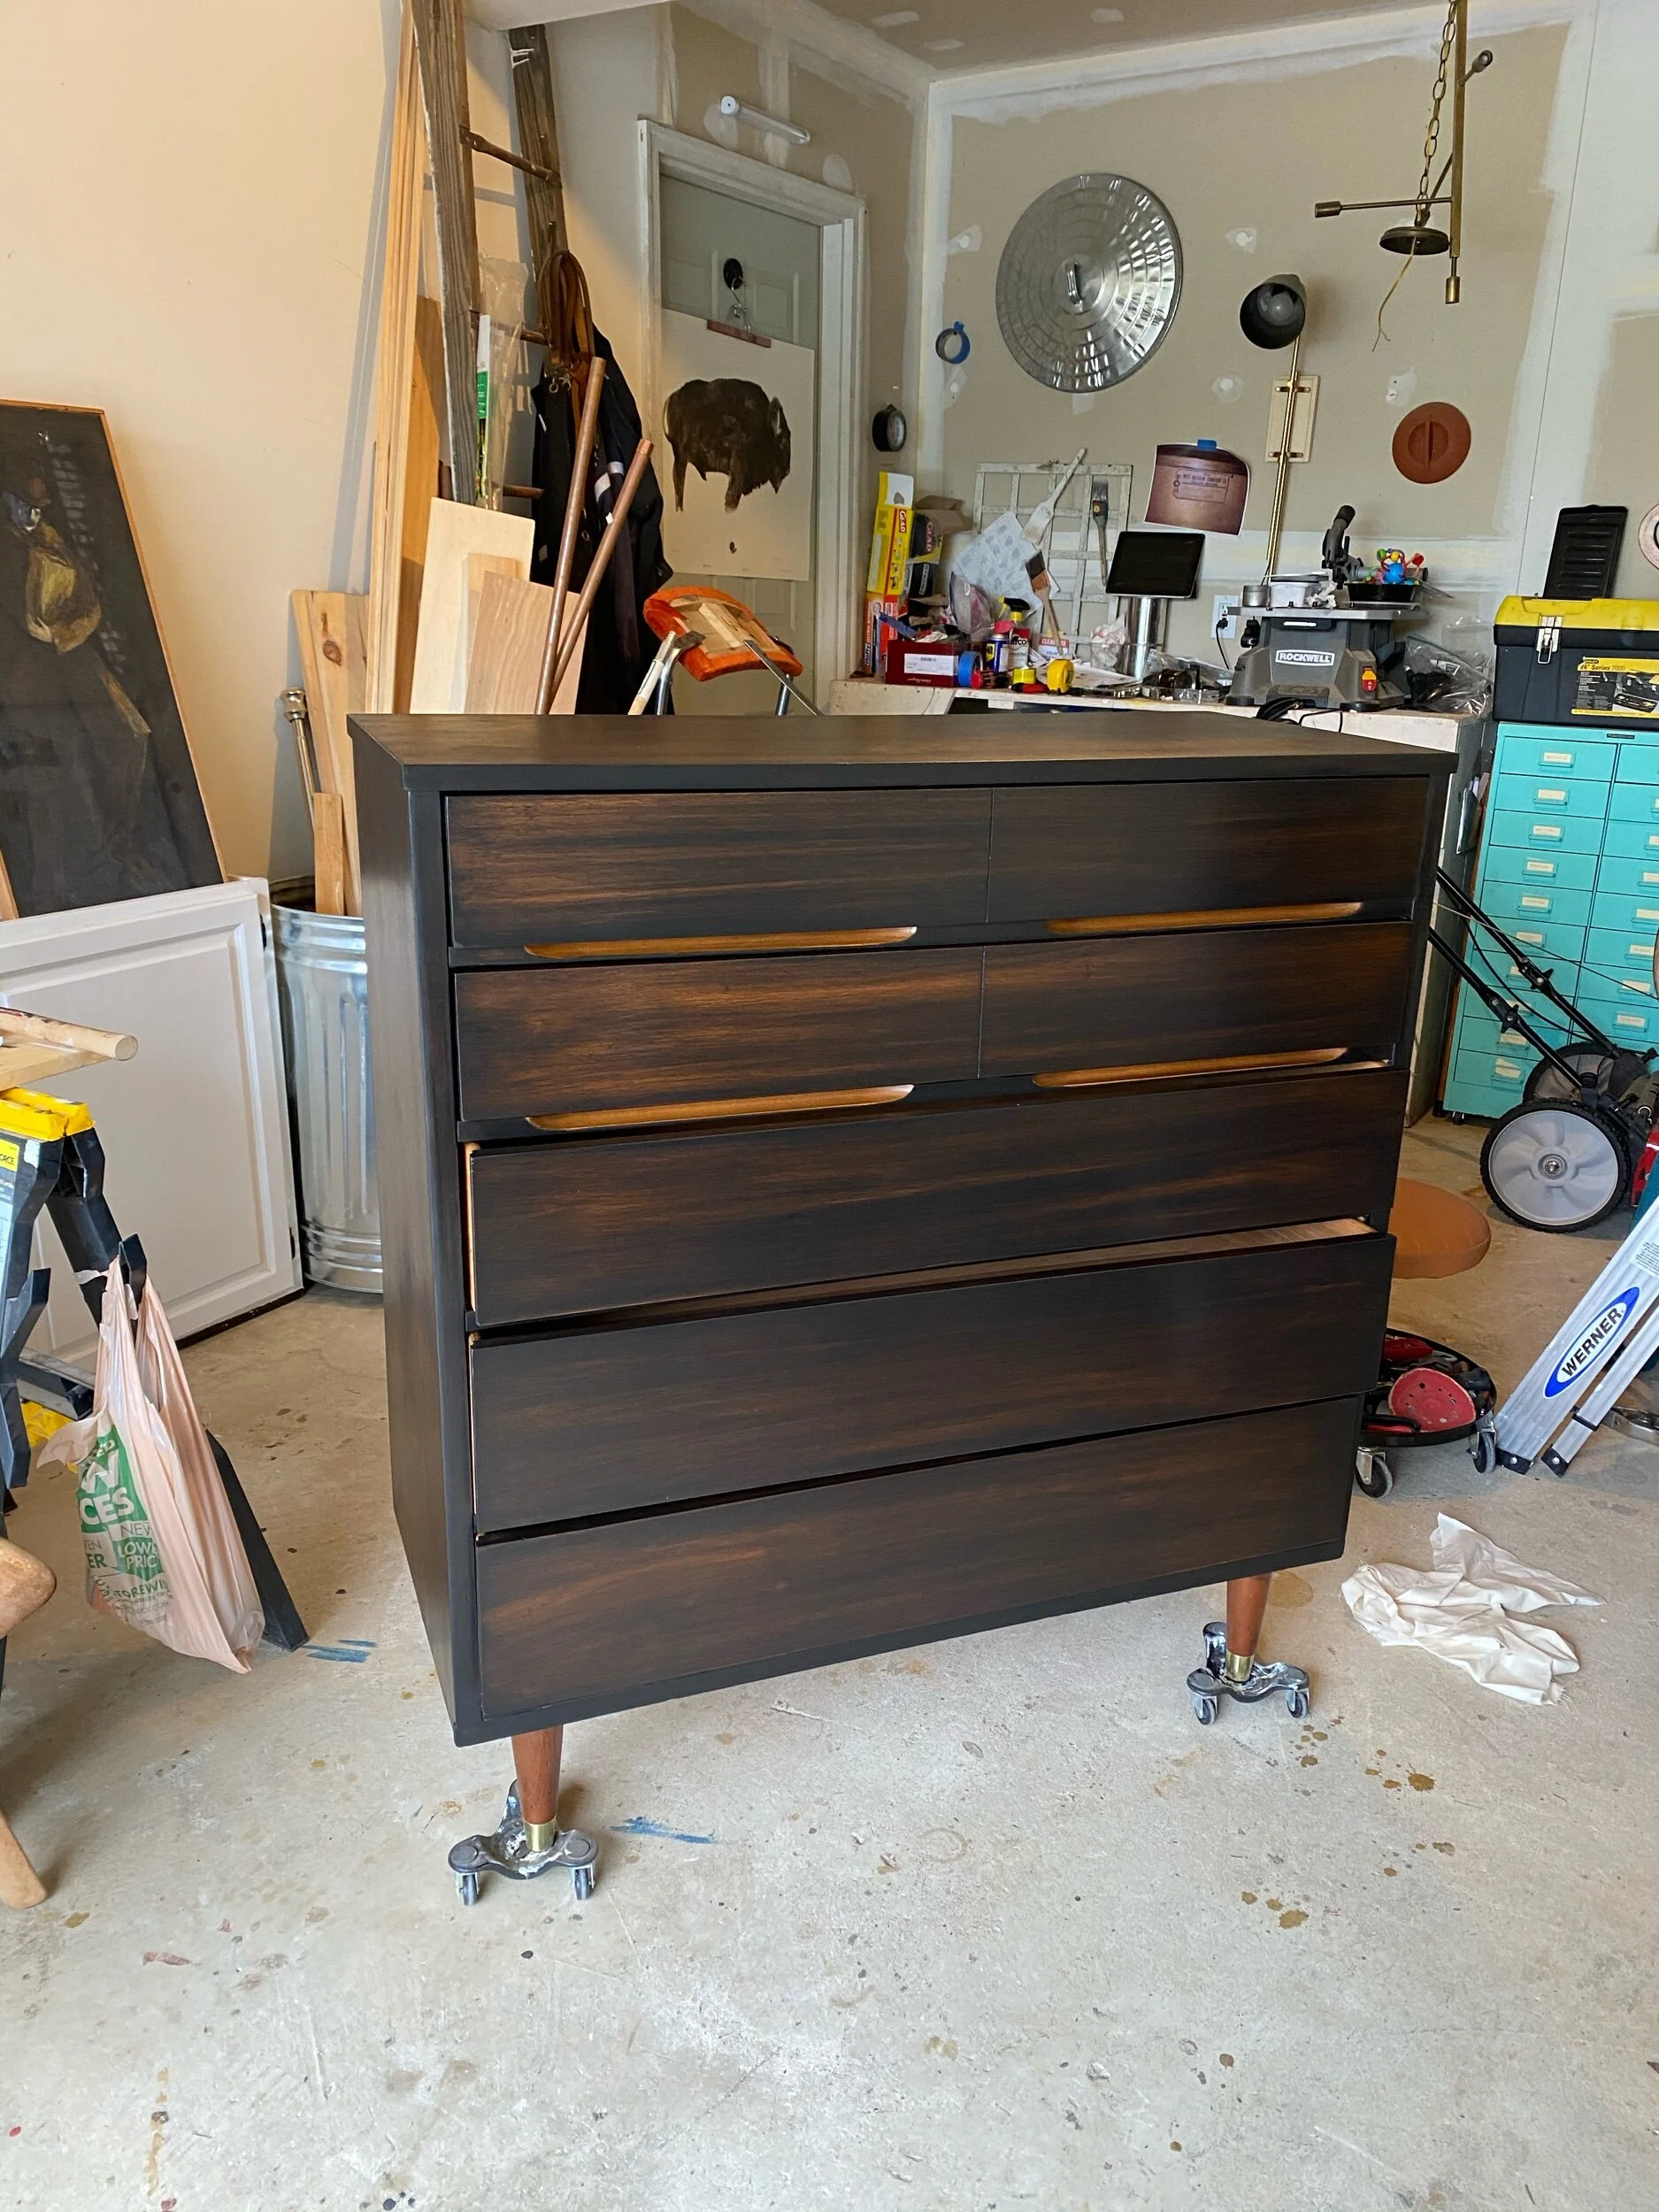
I was loving what I was seeing! The blacken body helped play up the warm wood in the legs and highlight the sculpted details on the trim work. Yes everything was going according to plan.

Adjustments.jpeg
 

Or so I thought…

See, I blatantly ignored the instructions on the can of gel stain choosing to seal it with my go-to soft wax finish instead of the recommended polyurethane. And as I applied the first coat of wax, I found that most of the dark stain I had painstakingly left to cure for 36 hours was wiping right off!

photo jun 01, 11 47 08 am.jpeg

Now it wasn’t the end of the world but it certainly wasn’t the finished look I was imagining for this piece. Don’t get me wrong, the gel stain still did it’s job and overall darkened the existing wood grain while masking all of my repairs. I can still count it as a win, but I had wanted more contrast between the black stain and the warm walnut details.

Instead this dresser ended up with a moody finish from the varied shades of black stain.

dsc06713.jpeg
dsc06717.jpeg

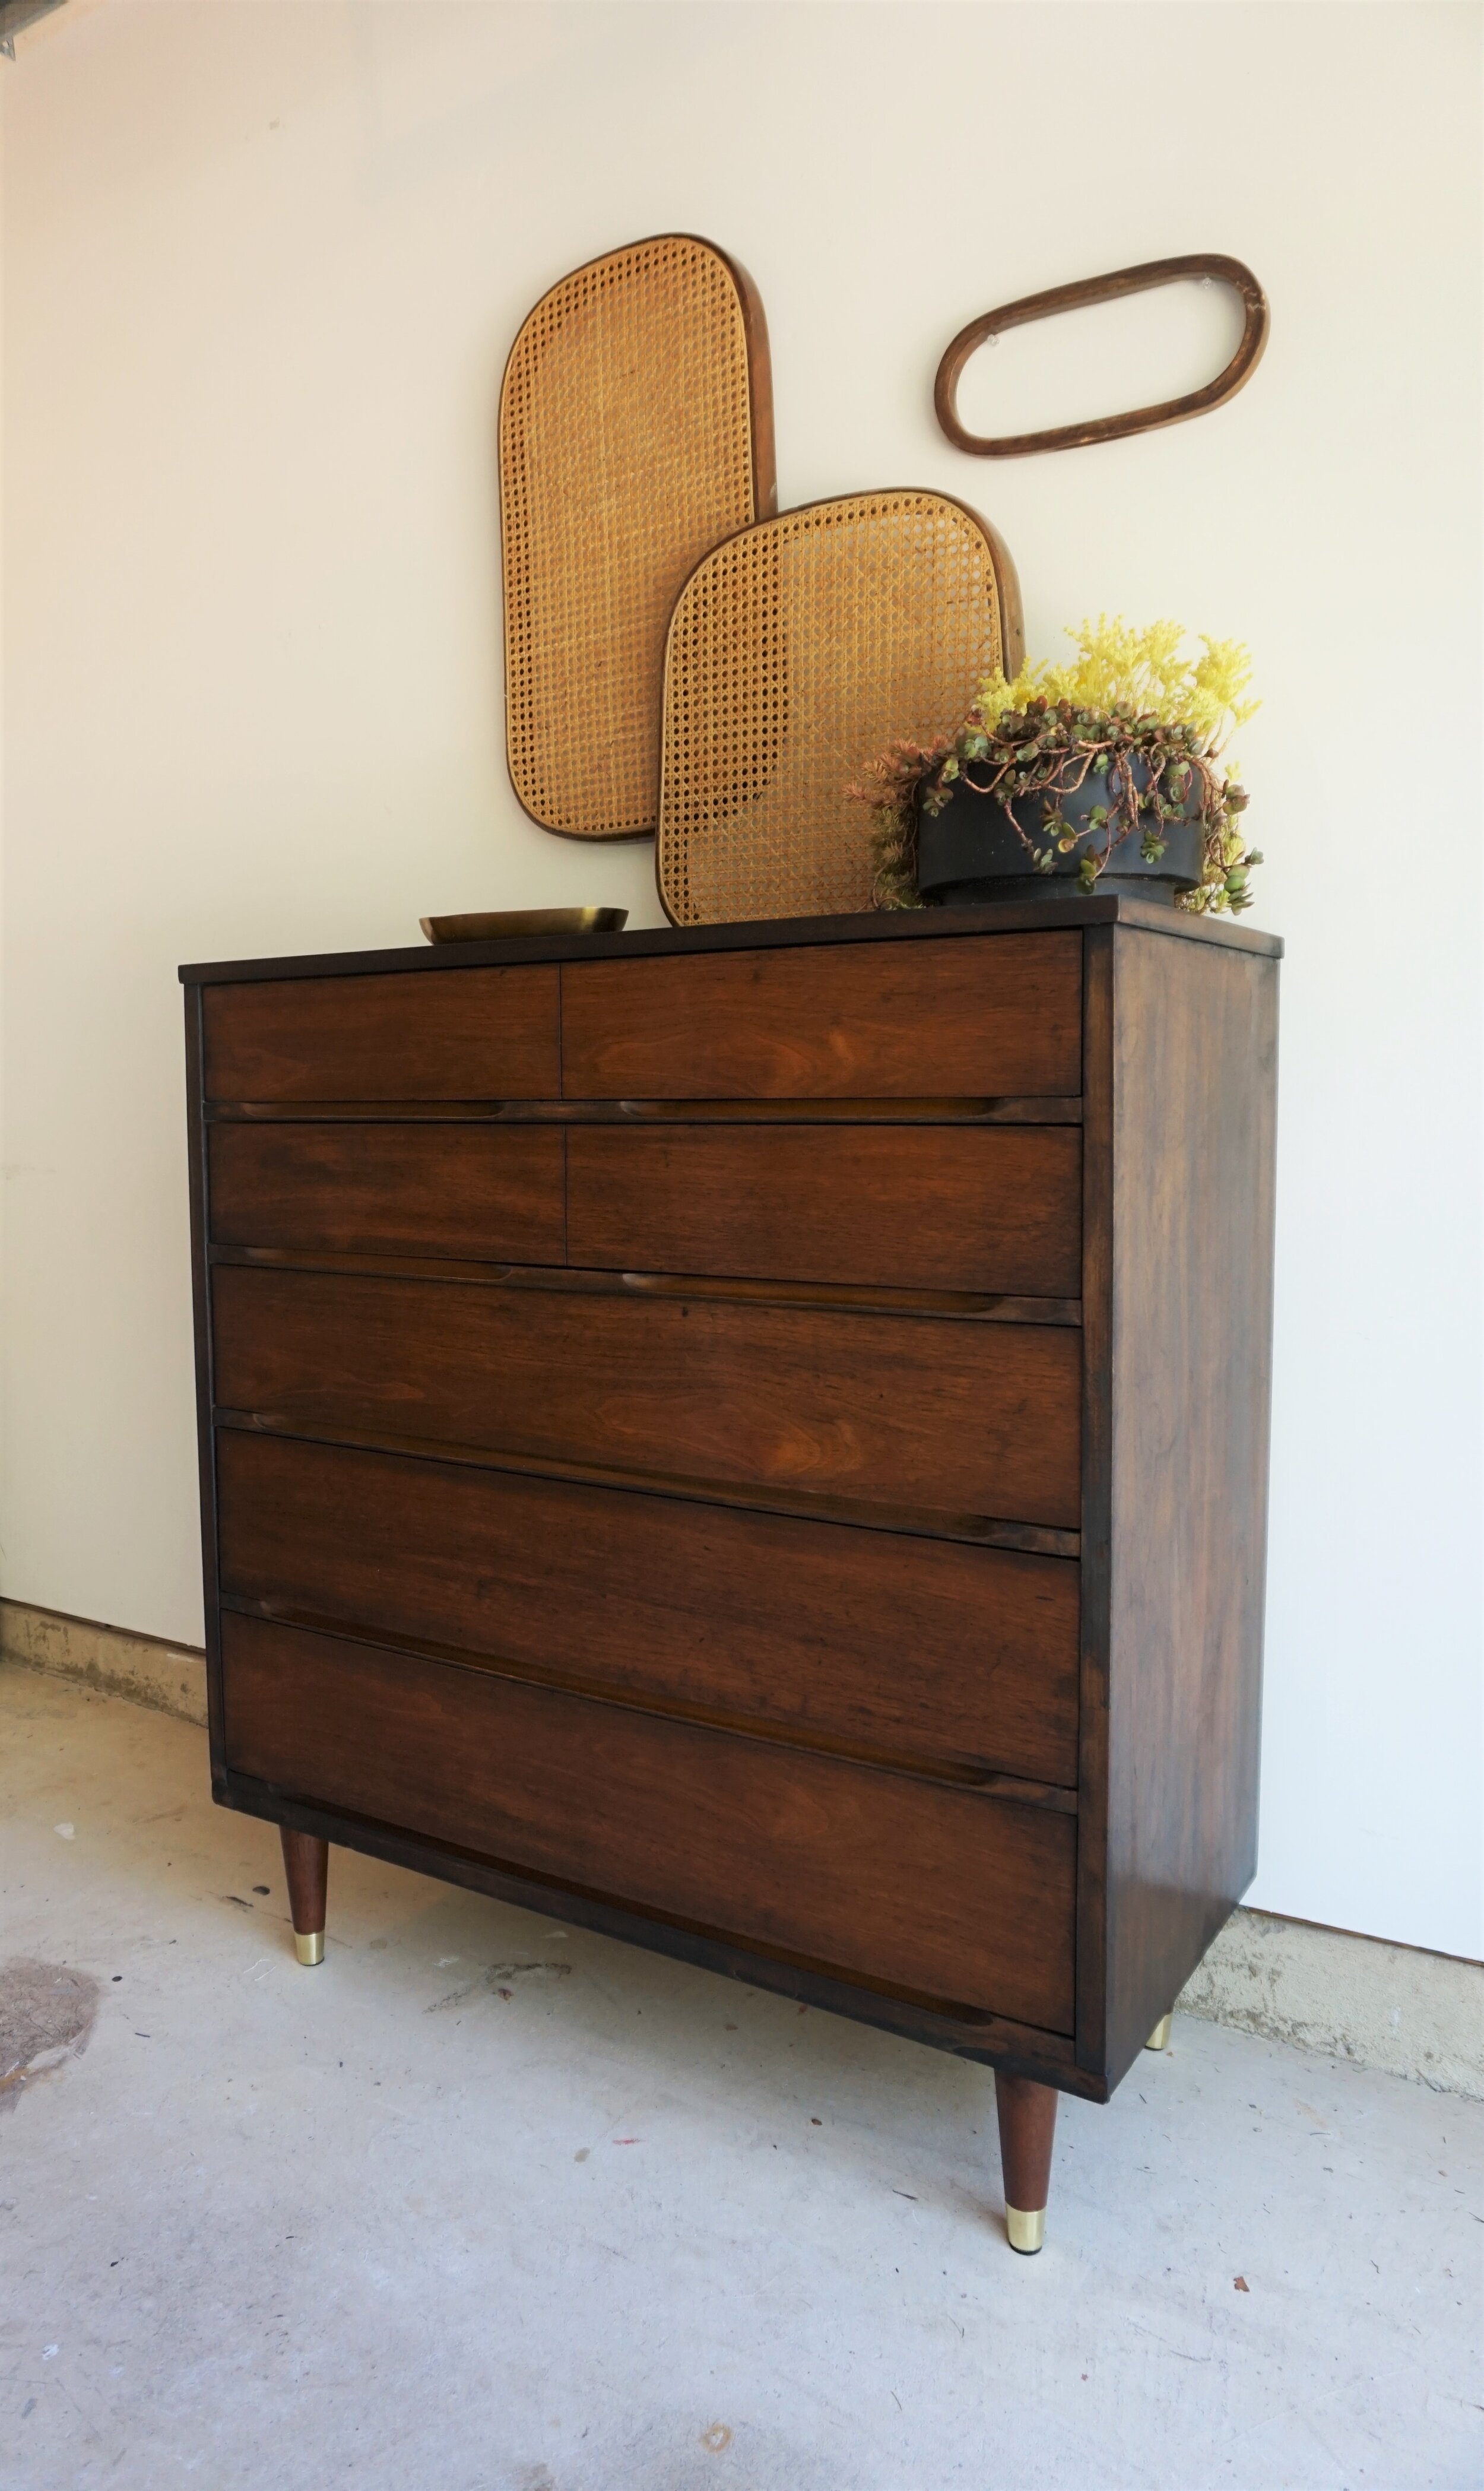
Although the finished product wasn’t intentional, this was a valuable learning process for me. And ultimately, I’m glad I took the risk even if it didn’t turn out the way I had imagined. I still spared this piece from a trip to the dump - and found a way to keep it relevant in this new-is-always-better world.

dsc06734.jpeg

It still celebrates the warm walnut tones but in a more rugged way than my signature matte paint finish.

dsc06723.jpeg
dsc06737.jpeg

For styling, I deconstructed a Thonet rocking chair. I know that may be a crime to some, but to me was a crime of opportunity - I’m just in love with those cane shapes!

dsc06719.jpeg
DSC06728.jpg
 

This piece has sold.


But if you are interested in a custom order like it, email me at cate@stylemutthome.com

Cate.jpg

If you’ve read this far, thank you. Thank you for letting me share my raw thoughts along with my finished pieces. I appreciate having this space to be creative and honest and I hope you are continually inspired to do the same. It takes courage to be vulnerable. But I think that makes for good soil to do some beautiful things.

Catch up on the 2020 Furniture Flip Bucket List

Black Garden Green Thumb

To be perfectly clear, MATT has the green thumb. He comes from a long line of green thumbs, in fact! We’ve discussed growing our own veggie and herb garden for years but like many of you with your home projects, hadn’t gotten around to it until this quarantine! A silver lining to what’s going on, indeed. So in a matter of a week Matt was struck with instant motivation and after 13 trips to Home Depot, we were ready to build!

He knew he wanted to make a 8’x4’ raised garden, meaning above ground. Meaning no digging. (hooray!) Matt, our kids, my sister who is staying with us, and I all pitched in and we finished the whole thing in a weekend. To be honest with you, I had no intention of turning this project into a blog post, let alone covering how we did it. But after sharing an image of our garden in an Instagram story, I had several interested peeps ask if we were going to share how we did it. SO, without further adieu, StyleMutt Homes first how-to video tutorial! Thank you, Matt!

So there’s our process in a nutshell.And here’s our list of supplies linked for your reference:

Raised Garden Supplies:
-Weedblocker Fabric
-Hardware Mesh
-3” PVC Pipe, 10 x 12” pieces, (so we bought 5 x 24” sizes and cut in half)
-2x6x8 lumber, (need 6: 4 you will keep whole, 2 you will cut in half)
-1x2x8 lumber, (need 6: 4 you will keep whole, 2 you will cut in half)
-2x2x8 lumber, (need 6, which you will cut down to 36”)

Now for my very small contribution. The black! Turns out the best spot for our garden is the side of our house near the front, which is perfectly seen from the road and as you enter our neighborhood. Because it’s so easily seen I wanted it to look sleek, modern, and like an extension of our home, (which is white with black shutters). I knew after a year that the raw wood would start to look gray-ed out and old, which wouldn’t bother me if it wasn’t in such a prime and visual place! So I chose exterior black paint to give the outside of the box and surrounding fence an upgrade.

8.jpg

Here is where we started, for reference, and some images of our process:

20.JPG
23.JPG
22.JPG

I had to include this just for Matt’s beard - one week before caving in to a trim! Thank you, Lord!

19.jpg
1.jpg

As Matt indicated in the video all 4 surrounding wall panels are removable, so our access to the garden from any side is easy-peasy! We will store these panels in our garage during the off season.

7.jpg
6.jpg

And one more itty bitty detail of our garden is our homemade garden stakes.

I used air dry clay, (found here from Michaels), and formed the stakes. Then I used tiny metal letter stamps, (borrowed from a neighbor - thanks, Beth! I’ll return soon, I promise!), and printed the name of each plant. While I love the typed look of these, the letters are incredibly small. We made some of these for my Mom for Mothers Day, and Shire carved the name of the plants in with a toothpick, which also looked sweet.

17.jpg
18.jpg

I can’t wait to add some landscaping here and make it a happy and pleasant place to be, but we are already having so much fun with this garden. There’s something about gardening that feels like such an act of hope and trust. Our house feels too small most of the time and there is so much uncertainty with our future that feels dependent on Matt’s job. But we’re continuing to sow roots anyways. And why not? When it’s time to go, we will obediently go. But in the mean time we will continue investing in this home that has served us for the past decade.

Thank you so much for stopping by today!

Chelesa.jpg

Design Reveal: Church Lobby

He goes before all things, and in Him all things hold together.
Colossians 1:17

First things first. Hi. I hope you are well, safe, and finding peace. In fact, I hope you are stumbling across plenty of things that bring you joy and laughter! There is no reason this season, however long it lasts for us, should be void of joy and laughter.

On that note, one thing that brings me joy is creativity! While this design project, our church lobby, was completed prior to the current world situation, I’ve never been more excited to share a finished project with you. I want to use the humble means I have through social media and this blog to connect with you over our common interest in design and encourage your own creativity.

Everything I intended to tell you about our Christ Community Church lobby design almost feels irrelevant now; sharing a public gathering space during a time like this may seem odd. But I see more hope here now than ever before! More on that, but first a little reminder of what it looked like prior to installation! (Don’t mind the red slashes - I’d saved the photos like this to indicate to everyone which walls we’d be painting) (Oh yea, and I happened to show up on the day they do food collection and distribution lol!)

Not a bad space, right! It’s big and open with high, unfinished ceilings. There is loads of light coming in through black trimmed windows. Our church lobby is a space that has seen a whole lot. It is mightily used in the most creative of ways. But there has always been greater potential for it. Those of us more aesthetically effected have longed for it to become what we’ve always known it could be: A space that pulls you in and invites you to linger. A place to socialize and a place to just ‘be’. An environment that is warm and safe and serves those who enter through its doors. But what does that actually look like? As an interior designer I feel the weight of stereotype that it’s materialistic, shallow work. I get that; it’s how I used to view interior design, too. But I think of it as a way to serve. It’s about creating an environment that makes others feel welcome and safe being themselves. Interior Design is not about creating perfection; it’s about creating comfort. Approaching projects with flexibility and peacefulness help me a lot in putting these feelings into a visual finished product.

When I was invited to help come up with a design for our church lobby last October, it was not a difficult task. For one, I have daydreamed about this space for a while, imagining what it could be. And not just me, but my dear friend, Nicole, too. From our blended ideas I was able to crank out a pretty quick design draft, which went through a few rounds of edits with a larger team, and we ended up with this:

Booth 2 (2).jpg
CCC Kitchen (2).jpg
CCC Lounge Area (3).jpg

The idea was to take our cavernous space and balance it from end to end and side to side. By selecting pieces of a certain scale, proportion and visual weight, we would be able to fill the space without adding a ton of stuff. We wanted to maintain enough open space for plenty of movement throughout, but provide several areas of seating that would cater to different needs. And we needed to ensure that the quality of the pieces brought in would be able to handle the heavy wear and tear of each week - the preschool who uses the church on weekday mornings, the multiple youth groups that come in every week, the regular breakfasts and prayer times that gather - I really wanted to source high quality, highly durable pieces that we wouldn’t have to worry about.

Our budget for this project was generous, however over half of it went to only TWO items - paying the electricians, and paying for 7 gorgeous fake leather 47” 12-channeled back booths from a restaurant furniture supplier. Everything else we got savvy and put in a good amount of sweat-equity, with one exception, (which you won’t miss)!

So come on in!

6.jpg
DSC_7165.jpg

One of the coolest things about designing a community space was getting to do it with the community itself. I have never had so much talent at a projects disposal before, so it was particularly fun getting to dream big and outside of the box, knowing others that could make it happen! This planked wall is the first mighty example! A very skilled guy at our church, Scott, did this wall in a night and a day with his Dad, and it’s just beyond amazing. He chose these 12” planks, which was a genius move for a 16' foot wall. And you might recognize the IKEA Ivar cabinets. I have admitted on here before that I use these in almost every project because they are ridiculously inexpensive and entirely customizable. My Matt put them together, I painted them, (same color as the walls), and Scott mounted them - the end result is a sleek information center with ample closed storage.

8.jpg
DSC_7177.jpg

Our free coffee station, which you see straight ahead when you enter the lobby, is a simple wood storage piece I found at a thrift store, and THE most ridiculous sign. George & Willy is a wildly popular small business specializing in commercial signage, and truth be told, I saved this sign of theirs back in November when thinking about the priorities of this space. I want all who walk through these doors to feel right at home and know where everything is. There’s nothing like walking into a strange place and trying to get your bearings. So clear signage that is visible from the front doors, but also complimentary to the overall design, is a critical element for this space. And this piece is that exception I was talking about earlier. George & Willy graciously sent us their Market Chalkboard sign when I shared the progress of this space on social media, with the simple line, “We would love to support your project!” Their generosity is truly a light of hope. I can’t wait to work with them again someday and support this fine company.

DSC_7204.jpg
DSC_7207.jpg

We had a big ol’ painting party to cover these walls in Polar Bear by Behr paint! All doors were painted the same, except the sanctuary doors. Another skilled craftsmen in our church, Bill, had added this beautiful trim work to the doors, and I painted them in Accessible Beige by Benjamin Moore.

DSC_7280.jpg

And because I just get excited about details, I sourced these wood and leather doorstops on Etsy.

7.JPG
DSC_7265.jpg
DSC_6953.jpg

The kitchen was a really fun space to work on because we did it very low cost but high impact! I used a stencil to add some visual weight to the peninsula, while an incredibly generous and talented friend, Danielle, made the giant letterboard happen! She also created and installed a gorgeous floral wall mural that you can see on the far right side of the image below, more on that soon!

DSC_7026.jpg
DSC_7164.jpg
DSC_7150.jpg
DSC_6937.jpg

The casual seating area by the front doors was one of the first edits to the original design, made by none other than our pastor and friend, Jeff! In my first draft, I ran the leather booth all the way down the right-hand wall, end to end. But Jeff thought we should have a more intimate, comfortable seating area by the front doors. Brilliant! I never see these chairs empty now and am so glad he suggested this! One of the final touches I requested here was a curated collection of books from him - he’s an avid reader and I thought it would be fun to include a mini library of sorts right out here on the floor!

DSC_7018.jpg
DSC_7023.jpg
DSC_7116.jpg
DSC_7126.jpg

Now, to those gorgeous 12-channeled back booths I told you about! The camel leather just grounds the whole space and makes it feel so cozy and warm.Plus, no toddler or teenager can destroy them! I sourced pillows from another favorite small business, Istanbluevintage.

DSC_7249.jpg
DSC_6988.jpg
DSC_7231.jpg

I painted our original barnwood mirror black and requested it to be rehung vertical, rather than horizontal, as it had been previously. This made room for some much needed sconces to illuminate the space in the evenings.

DSC_7042-1.jpg

I’ve shared peeks of this mural on Facebook and Instagram, but it’s such a delight to finally share it here with the rest of the finished space! As I mentioned, we got to benefit from the talent of local muralist, Danielle, owner of Fun Places Murals & Painting. Incorporating her gift in this space was just beyond amazing; I still can’t believe how beautiful this turned out!

DSC_7015.jpg

I sourced our sturdy sofa from Article, my go-to for soft seating. It’s the only color in the space, but being at the far end of the room it definitely draws you in and gives the eye something to fall on.

DSC_7076.jpg
DSC_7030.jpg
DSC_7081.jpg
5.jpg
DSC_7097.jpg
DSC_7070.jpg

Looking over these images just makes me that much more excited to gather again. We put in the effort for this space so that we could gather and be inclusive and provide a place for all to feel safe and welcome. If the past few weeks have taught us anything, it’s that we need community. And I can’t wait to see this place filled as it was meant to be someday soon. When this is all over, you have a place to come hang out, people of the Ashburn, VA area! We will be ready for you and we can’t wait to see you soon. In the mean time, if you’re interested in some time of peace and encouragement, we do have virtual weekly messages available. You can find them on our home page here.

DSC_7225.jpg

That’s a wrap! A tremendous thank you to my dear friend, Morgan, for jumping in at the very last minute to take these pictures. She has a beautiful eye for capturing people, and I know shooting an interior was out of her comfort zone. Don’t you think she nailed it?! So, so proud of her and beyond grateful to get to benefit from her skills. From start to finish this space has been an awesome group effort. It just makes me delighted to see what so many talented, creative, and generous people could accomplish together.

Praying you have peace and good health during this time and the ability to find fun in the mundane! Don’t stop forgetting that this. is. temporary.

So grateful for you all and thank you for coming by today!

Chelesa.jpg