Kitchen makeover!

Hi guys! Welcome to our kitchen makeover! This week will be all about before and after photos, tips on painting cabinets in chalk paint, and a few unique ideas that will help put a personal stamp on the most frequently trafficked room in the house. 

So let's get started! We've got 30yr old cabinets which we've been planning on painting since before we moved in 3 years ago. I'd been waiting for a 'right time' to get the job done, but really, is there ever a right time for such a task? I was dreading it, to be honest.
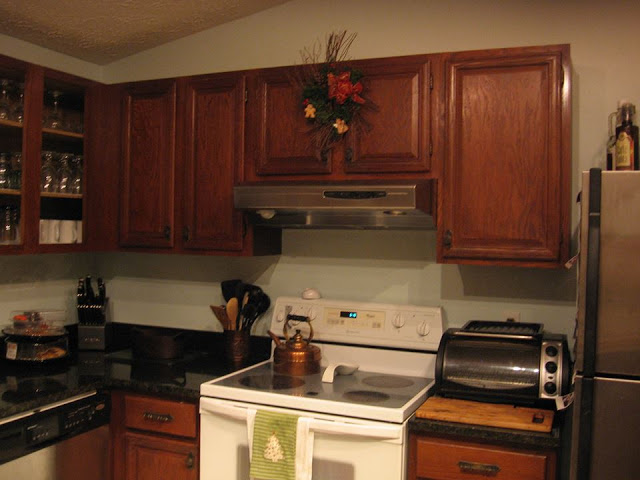
Kitchen before

Finally one morning in early August, I was sipping my coffee while my little ones ate their breakfast, and got the sudden, overwhelming urge to go for it. I had already purchased my paint, (months prior), and had all my supplies just collecting dust in the garage. It was go time! So to start, I made a huge mess. Everything had to come out of the drawers, cabinets had to be removed.

Kitchen After

**In this case, 'after' is a super loaded word. I'll give you a detailed account of what went into the process of painting our cabinets and how it went using Annie Sloan Chalk Paint tomorrow!

Last Friday I posted about my new interest in woven rag rugs - this one I fount at Target for $13, and it is SO thick and soft!

I really, really  liked the original drawer pulls that were already on our drawers. I took them outside, laid them on cardboard, and gave them a couple coats of black spray paint by Rustoleum, my favorite brand for spray paint. (I bought new, simple black knobs from Home Depot for the cabinets, 95 cents each).

If you were to take a closer look at our cabinets you would find imperfections, which I will vulnerably include  in the details of this makeover tomorrow. But, as my very kind husband reminds me every time I point out an imperfection, doing this myself saved us thousands of dollars. It's so close to my dream for this kitchen and I couldn't be happier with the results. 

Thank you all for reading!

~Chelsea

This post was originally featured under Chelsea's Garage, now affectionately known as StyleMutt.

Duck Egg + gold casters

Hi friends! I absolutely adore the piece I'm showing you today; in fact, I was so excited to begin working on it that I completely neglected a before picture. Shame, shame. I wish I could say it won't happen again...

When I found this amazing coffee table, (originally a messy dark stain with lots of nicks and scratches), showing off it's gold capped casters, I felt a little challenge to make it something exciting. After sorting through various colors that are more classic and sophisticated in nature, I decided on Duck Egg by Annie Sloan Chalk Paint - a rich aqua that is playful and fun, but elegant and classy when distressed and paired with gold.

SOLD

The low-down:
-Cleaned the piece using a damp cloth
-Blue taped each gold cap to protect from paint
-Applied 2 even coats of Duck Egg by Annie Sloan Chalk Paint using a 3" brush
-Distressed every corner and edge with a medium sanding block
-**Sealed using Minwax Polyurethane clear semi-gloss

**I wanted this piece to really shine. Traditionally, chalk paint is sealed with soft clear wax, which works beautifully to protect pieces. However, you  to will end up with a fairly matte finish, even after buffing. I love the matte finish, but every once in a blue moon I want to give a piece some real shine. If you want a shinier, glossier finish, there is nothing wrong with applying a clear gloss sealer over a chalk painted piece. If you are using a lighter color, just be sure you choose a water based gloss sealer, rather than oil based, which can result in yellowing the finish. Water based gloss sealers will keep your white pieces white. I've sealed chalk painted pieces in Minwax Polyurethane clear semi-gloss only a handful of times, but it has worked out really well each time I've tried it.

Thank you for stopping by! 

~Chelsea

This post was originally featured under Chelsea's Garage, now affectionately known as StyleMutt.

Retirement for a tired suitcase

It's pretty awesome to find a gem on the side of the road, such as with yesterday's roadside rescue. To find two in one week? Ridiculously awesome. Last week was a pretty good week...

Descent smelling, good condition, camel color leather suitcase left out for trash pick-up during an evening walk?

Don't mind if I do!

I had two similar ideas for this item: keep it together and create a bar cart, or break it in half and create two bedside tables. Since I am in need of a couple bedside tables for a design project, (which I can't wait to share with you soon), I decided to separate the two halves of my suitcase. It really was very easy to do and required just a little cutting with handheld garden shears. 

The next part I forgot to photograph, but it's easy to explain. I set up a couple wooden TV tray tables outside with some cardboard underneath, and sprayed them with satin black spray paint by Rustoleum. Then I set one suitcase half on top of each table and screwed them onto the tabletop, (one screw per corner of the table, so 4 total per table). 

The final product

I love the details that make these tables so unique. I didn't try to remove the handle or the locks or change the quality of the leather. I really kept the character of this old suitcase in tact, right down to the leather packing strap.

Leather suitcases are popping up in home design a lot these days, especially now that few people actually travel with leather suitcases anymore. All we have in our closets here are rolling suitcases or duffle bags! How about you? Would you decorate using a leather suitcase?

~Chelsea

This post was originally featured under Chelsea's Garage, now affectionately known as StyleMutt.