Industrial Pipe Shelves ||Reveal + Tutorial||

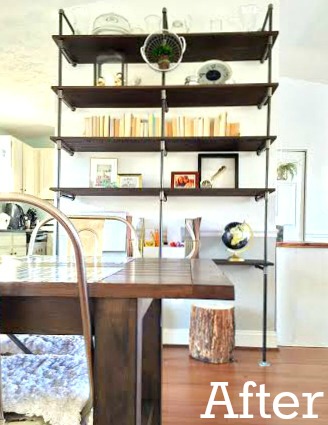
Hi, All! I'm thrilled to finally be sharing this crazy fun and super big project with you today! If you're an Instagram friend then this post might be a little anti-climatic since I've been sharing pictures of these shelves for the past couple months. I decided to wait until after the holidays to post about our new industrial build, so we've had a bit of time to grow into it. You may have seen pipe shelves before - I've seen folks build small ones in bathrooms, as well as over entire walls as more of a 'built-in' look. Here is our version of these fabulously industrial shelves:

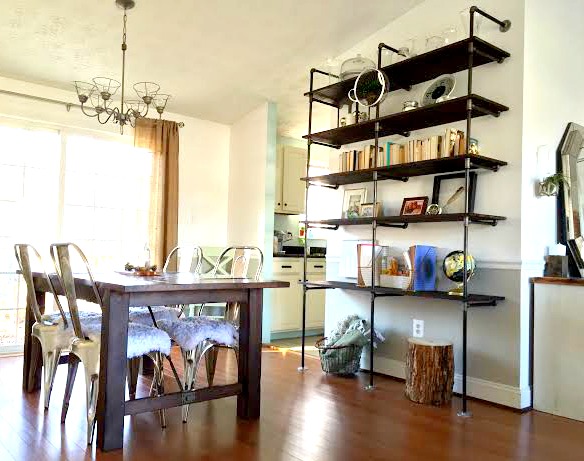
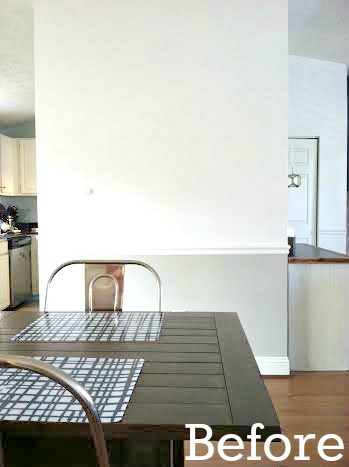
Aren't they rad?! We previously had a china cabinet on this wall which I enjoyed refinishing in a beautiful Duck Egg blue. But, as the kids got a little older it wasn't a practical piece for us and I needed way more open storage. I shared a few inspiring pictures of industrial shelves with Matt, he loved the idea, and we got to work almost right away! Building this was WAY easier than I had expected, and I'm going to show you how right now!

Let's have some fun, shall we?

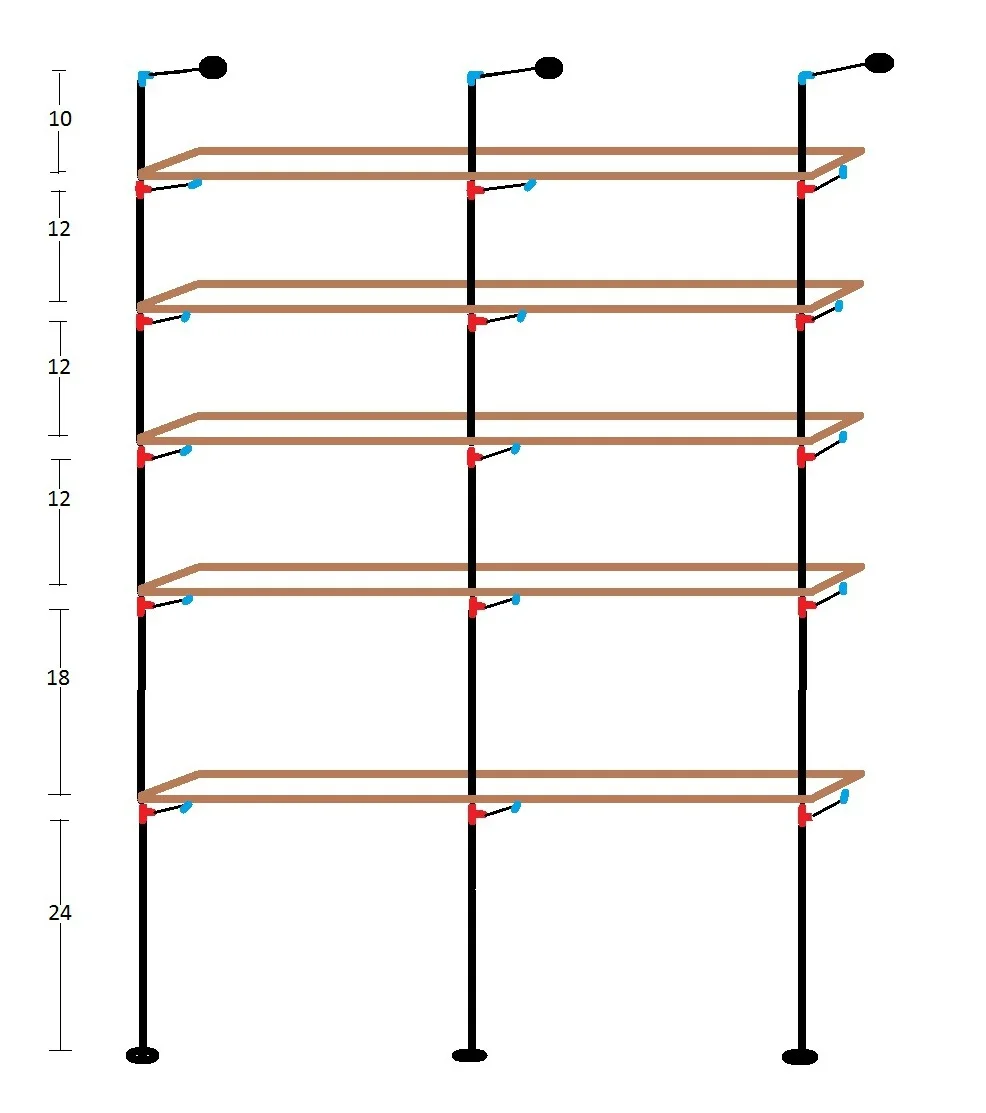
First, we measured our wall and created this digital design of what we wanted to build. I wanted room at the bottom shelf to slide a stool or two under to use as a make-shift desk for our kids.

Then it was time to gather the supplies! I kid you not, gathering all the pipes and pieces for this project took longer than the actual build. I highly recommend calling your designated hardware store ahead of time and asking them to check their stock of each piece! Here's what we came home with:

Supplies pictured above:
3 x 24" 1/2" pipes
3 x 18" 1/2" pipes
3 x 14" 1/2" pipes
24 x 12" 1/2" pipes
3 x 10" 1/2" pipes
18 x 1/2" elbows
16 x 1/2" tees
6 x 1/2" flanges
Supplies not pictured above:
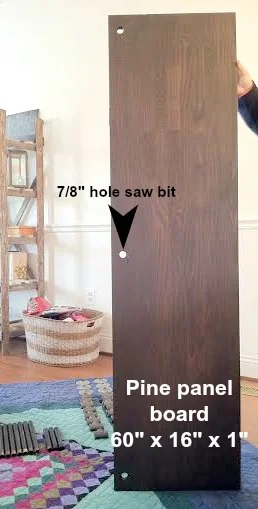
5 x 60"x16"x1" Pine Panel Boards
7/8" hole saw bit
Wood Stain for the boards, (we used Kona by Minwax)
Metallic spray paint for the pipes, (we used Rustoleum Oil Rubbed Bronze)
Lysol wipes to clean the pipes

TOTAL COST FOR ALL SUPPLIES: Just under $450

Once you have all of your supplies home, you'll want to clean the grease and oil off of the pipes before you spray paint them. Just give them a good wipe down with Lysol wipes, let dry, then spray them. Once the pipes are dry, it's time to build! Work from the floor up:

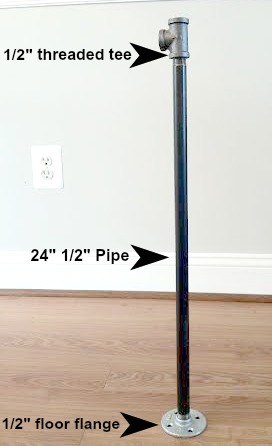
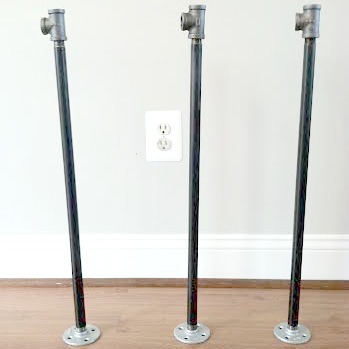
Following our digital design, we just started threading everything together like a good old fashioned erector set! At this point we have not screwed anything into the wall or floor. The pipes and fittings were screwing together so tight and were so incredibly sturdy, there was no need to anchor anything until we got up to the very top.

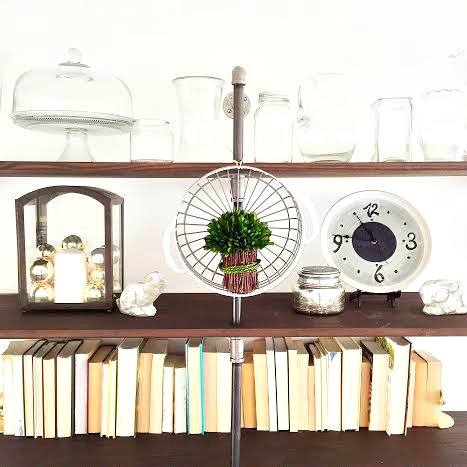
The panel boards, which we pre-drilled the holes on, just slid right over the vertical pipes, and rested on the horizontal 12" pipes with the elbow supporting the side closest to the wall.

Once we got to the top, (and again, at this point nothing is anchored to the floor or wall, but the sheer weight and tightness of it all kept it so sturdy), we used 3 x 14" pipes threaded into the top three elbows, (seen in the picture below without the pipes), and then threaded the other end of the 14" pipes into the flanges. We then screwed the flanges directly into the wall for additional security. The bottom flanges are just sitting on the floor, not screwed in. It's really not necessary once you see how sturdy the structure is.

A view of the finished product from the middle. It really was a quick build! The prep work took a bit of time, (gathering the supplies, cleaning and spraying the pipes, staining both sides of the boards and drilling the holes), but the actual structure went up pretty quick!

These shelves have been so much more functional for us. The bottom shelf is completely stocked with kids' activities and supplies and now that they're out in the open, we are doing way more activities together. That is such a gift in and of itself!

I hope if you ever want to give these shelves a go that this tutorial is helpful for you! Please don't hesitate to ask any questions you have! One discovered bonus to these shelves versus actual built in shelves is that these are transportable! If we ever move from this home, we'll be able to bring these with us, (and we can always add on if need be).

Thank you so much for stopping by and have a wonderful weekend!


Small BR Swag

Hi All! Just a warning, there will be lots of potty talk today - loads and loads of it. I am sure the holidays and all the extended family time have that effect on some people, but today we're actually talking bathrooms! We are approaching a very busy time of year for home updates. All those projects that people have been saving for 'after the holidays', are now staring them right in the face. For us, it's our master bathroom. Here is a not-super-interesting fact: Our master bathroom is 47" x 56", (plus a shower) . Single pedestal sink, no counter-space, no storage. I am so very grateful to have our own bathroom, don't get me wrong. I would just prefer not to wait in line to brush my teeth, (a line that only consists of two people).

I know the number of people facing this same issue is growing as folks are opting to live smaller these days, in general. But, does smaller floor space automatically mean sacrificing modern amenities? 

Using the incredible online bathroom fixture and amenity resource, DecorPlanet, I spent a bit of time researching space saving ideas and storage solutions which are still high in style and comfort.

Here is a sample of a bathroom I designed with DecorPlanet amenities. My goal was to be mindful of space but use every opportunity to marry function and glamour.

I really, (really), enjoyed swooning over the brass fixtures that DecorPlanet offers. If there's ever a time to go brass, it would be in a small bathroom. The impact is so stunning! To send the brass soaring I complimented it with a classic blue and white palette accented with snaps of red. However, as I tend to prefer rooms that are just a bit off beat, I used large scale patterns on both the wall as well as the shower curtain. This keeps it from going too traditional and gives the space a slightly more eclectic look.

Let's scale back all the 'extra's' to show off all the DecorPlanet pieces:

DecorPlanet has thousands of beautiful bathroom amenities so it was really hard to decide which pieces to use for this design, but once I started down the brass road there was no turning back. I actually had a dream about this bathroom after I finished the final design!

Here are the details for each piece I chose and why I used them:

1. The double sink: Whitehaus Large U-Shaped Double Basin Console with Chrome Overflows and Towel Rails - China Series. I chose this piece because it's compact without sacrificing the double sink. By using a console sink, there is opportunity for storage underneath for waste baskets of containers holding spare towels or toiletries.
2. Waste basket: Nameeks Windisch Waste Basket 89102
3. Medicine cabinet mirror: Fresca 40 Wide Bathroom Medicine Cabinet with Mirrors. ModernBath offers a large variety of mirrors, both with storage and without. I chose a simpler design with interior storage since I knew I'd be adding a chandelier in the space, rather than wall mounted lighting.
4. A bathroom chandelier...sure, why not?! The Kichler Rossington 5 Light Chandelier in Natural Brass, (which I 'hung' a bit low just to fit it in), is anything but conventional, but the impact it has on this soft, feminine bathroom is striking. They also have a 3 arm version of this fixture.
5. Wall mounted tolilet: Eago WD101 Modern Wall Mount Dual Flush Toilet. I'm a huge fan of wall mounted toilets and they are growing in popularity for private residences. This sleek design not only looks stylish but has a very small footprint in the floor plan, saving a decent amount of space!
6. Brass toilet paper holder: Smedbo Villa V241 Toilet Roll Euro Holder Without Lid in Polished Brass
7. Brass + glass shelves: Nameeks Windisch Bathroom Shelf 85506ON. There is loads of space above a toilet for storage if necessary. These gorgeous shelves with their brass edges can almost double as wall art!
8. Brass clawfoot tub: Nameeks Knief Edwardian XL Bathtub 0100-063-O. Who doesn't want a clawfoot tub? With the right size, a clawfoot tub with shower attachment can still be a practical solution for a small space.
9. Brass towel bar: Danze Opulence™ Towel Bar 24 in Polished Brass PVD. This towel bar, like the chandelier, is very clean lined and simple in design. When using a finish with so much shine, as brass, I like to use pieces with minimal embellishment and let the beautiful reflections do the talking.

Small bathroom design might not be relevant to you right at this moment, but perhaps it will be someday. My goal was that these ideas at least give you a bit of hope that functional design can still meet your style aesthetic. Need some more inspiration? Follow the link below for DecorPlanet's round up of space saving solutions!

Thank you so much for stopping by and have a wonderful day!

*This was a sponsored post, but every word, opinion and design, (for better or worse), are mine.

Favorite Transformations of 2014!

Hi Friends and Happy 2015! This post has been particularly fun to put together as it's been a big year for us! It's been a year of dramatic DIYs and transformations, starting with this blog itself!

We said goodbye to Chelsea's Garage just a few short months ago to begin something fresh and new with StyleMutt. It's been an awesome beginning and we are really excited about what 2015 will hold!

We're ready to dive into 2015 and even have some spectacular projects already up our sleeve, but first, we're taking a day to reminisce  over our favorites from 2014:

No question, we share more than a few style loves - not the least of which is mid-century modern!`

white lacquered set.jpg

And we discovered just how fun it is to work with bamboo!

bamboo coffee table.jpg

But we are true StyleMutts, through and through, and enjoyed embracing the many styles that make us tick::

aqua chair.jpg

Of course, not all the transformations involved furniture:

In fact, some of the transformations were of entire spaces!

It's been a tremendous year, indeed, and we just want to say THANK YOU for hanging with us, for your encouragement, and for making this adventure completely worth it. Happy New Year, Friends!

Chelsea and Cate